Drawable资源
<?xml version="1.0" encoding="utf-8"?>
<color xmlns:android="http://schemas.android.com/apk/res/android" android:color="#563459" />
|
每个Shape Drawable都包含如下属性:
类型:通过shape属性来指定:
Line 一条横跨了父类View的宽度的水平线。
<shape xmlns:android="http://schemas.android.com/apk/res/android"
    android:shape="line" >
    <stroke android:width="2dp" android:color="#ff0000" />
</shape>
rectangle 矩形
<shape xmlns:android="http://schemas.android.com/apk/res/android"
    android:shape="rectangle" >
    <stroke android:width="2dp" android:color="#ff0000" />
</shape>

oval 圆弧
<shape xmlns:android="http://schemas.android.com/apk/res/android"
    android:shape="oval" >
    <stroke android:width="2dp" android:color="#ff0000" />
</shape>

ring 圆环
<shape xmlns:android="http://schemas.android.com/apk/res/android"
    android:shape="ring"
    android:innerRadius="100dp"
    android:thickness="10dp"
    >
    <stroke android:width="2dp" android:color="#ff0000" />
</shape>


使用stroke可以指定:轮廓的颜色,线宽,虚线长度,虚线间隔
<stroke android:width="2dp" android:color="#ff0000" android:dashWidth="10dp" android:dashGap="5dp"/>

填充颜色:
<solid android:color="#324390"/>

边角
 <corners
        android:bottomLeftRadius="10dp"
        android:bottomRightRadius="10dp"
        android:topLeftRadius="10dp"
        android:topRightRadius="20dp" />
内边距
<padding android:left="35dp"
        	android:right="35dp"
        	android:bottom="35dp"
        	android:top="35dp"/>

渐变效果
线性渐变:
<gradient
    android:angle="45"
    android:centerColor="#ffffff"
    android:centerX="60dp"
    android:centerY="100dp"
    android:endColor="#000000"
    android:startColor="#000000"
    android:type="linear"
    android:useLevel="false" />


 辐射渐变
<gradient
    android:centerColor="#ffffff"
    android:endColor="#FF0000"
    android:startColor="#000000"
    android:type="radial"
    android:useLevel="false"
    android:gradientRadius="300"/>


 扫描渐变
 <gradient
    android:centerColor="#ffffff"
    android:endColor="#000000"
    android:startColor="#000000"
    android:type="sweep"
    android:useLevel="false"
    android:gradientRadius="100" />
|
变换Drawable–ScaleDrawable
<?xml version="1.0" encoding="utf-8"?>
<scale xmlns:android="http://schemas.android.com/apk/res/android"
    android:drawable="@drawable/ic_launcher"
    //缩放中心
    android:scaleGravity="center_horizontal|clip_vertical“
   //相对于原始Drawable的包围框的目标宽度和高度
    android:scaleHeight="100%"
    android:scaleWidth="100%" />
在部件文件中使用scaleDrawable
 <ImageView
        android:id="@+id/imagescale"
        android:layout_width="match_parent"
        android:layout_height="wrap_content"
        android:layout_weight="1"
        android:src="@drawable/scale" />
在Activity中添加:
mImageScaleIv = (ImageView) findViewById(R.id.imagescale);
mImageScaleIv.setImageLevel(5000);
//Level值在0-10000之间,5000表示50%
|
变换Drawable–RotateDrawable
<?xml version="1.0" encoding="utf-8"?>
<rotate xmlns:android="http://schemas.android.com/apk/res/android"
    android:drawable="@drawable/ic_launcher"
    android:fromDegrees="0"
    android:pivotX="50%"
    android:pivotY="50%"
    android:toDegrees="180" />

在部件文件中使用rotate Drawable
 <ImageView
        android:id="@+id/imagerotate"
        android:layout_width="match_parent"
        android:layout_height="wrap_content"
        android:layout_weight="1"
        android:src="@drawable/rotate" />
在Activity中添加:
mImageRotateIv = (ImageView) findViewById(R.id.imagerotate);
mImageRotateIv.setImageLevel(5000);
//Level值在0-10000之间,5000表示50%
|
LayerDrawable
LayerDrawable允许在Drawable资源之上组合多个Drawable资源,如果定义一个半透明的Drawable数组,那么可以将他们彼此堆叠起来,以创建动态形状和变化的复杂组合,LayerDrawable的定义如下所示,其中第一个定义的位于对下方:

<?xml version="1.0" encoding="utf-8"?>
<layer-list xmlns:android="http://schemas.android.com/apk/res/android" >
    <item android:drawable=“@drawable/image1"/>
    <item  android:drawable="@drawable/image2“/>
    <item  android:drawable="@drawable/image3“/>
    </item>
</layer-list>

在布局中使用LayerDrawable
 <ImageView
        android:id="@+id/image"
        android:layout_width="match_parent"
        android:layout_height="match_parent"
        android:src="@drawable/layerdrawable"
 />
|
状态列表Drawable
允许根据包含该状态列表的View的状态指定一个不同的Drawable。
状态有如下几种:
State_pressed:按下或没有按下
State_focus:有焦点或者没有焦点
State_hovered:光标在View上悬停或者不悬停
State_selected:选中或者没选中
State_checkable能或者不能被选中
State_checked:被选中或者没有被选中
State_enabled:启用或者禁止
State_activited:激活或者未激活
State_window_focus:父窗口有没有焦点
每个状态可以设置为true或者false。对于一个给定的View确定该显示哪个Drawable时,Android会使用和当前状态匹配的状态列表中的第一项。因此默认值应该放在最后。
<selector>
        <item              />
</selector>
|
级别Drawable
使用级别列表可以创建Drawable的资源序列,并给每一层指定一个整形的索引值,如下所示:
<?xml version="1.0" encoding="utf-8"?>
<level-list xmlns:android="http://schemas.android.com/apk/res/android" >
    <item android:drawable="@drawable/nw0" android:maxLevel="0"/>
    <item android:drawable="@drawable/nw1" android:maxLevel="1"/>
    <item android:drawable="@drawable/nw2" android:maxLevel="2"/>
    <item android:drawable="@drawable/nw3" android:maxLevel="3"/>
    <item android:drawable="@drawable/nw4" android:maxLevel="4"/>
    <item android:drawable="@drawable/nw5" android:maxLevel="5"/>
    <item android:drawable="@drawable/nw6" android:maxLevel="6"/>
    <item android:drawable="@drawable/nw7" android:maxLevel="7"/>
    <item android:drawable="@drawable/nw8" android:maxLevel="8"/>
    <item android:drawable="@drawable/nw9" android:maxLevel="9"/>
</level-list>

在代码中选择要显示的图像:可以使用如下所示

public void onClick(View v) {
	mCount=(mCount+1)%9;
	mImageIV.setImageLevel(mCount);
}
|
Bitmap && BitmapFactory
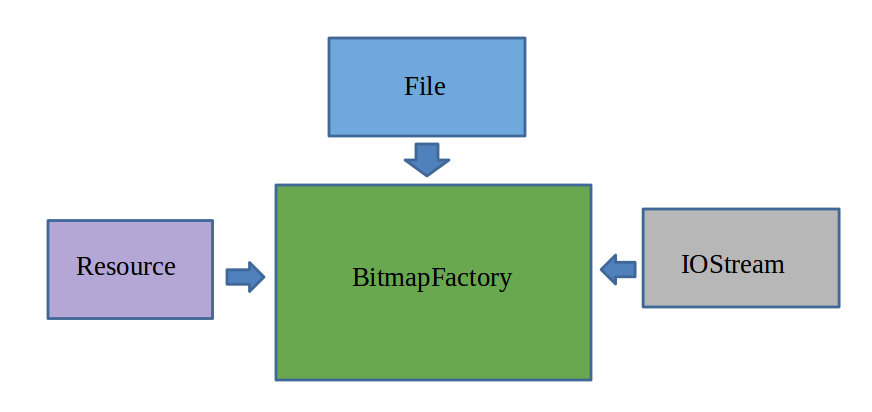
decodeFile(stringpath) 用于从给定的路径中解析Bitmap
decodeFileDescriptor(FileDescriptor fd) 用于从FileDescriptor对应的文件中解析
decodeRescource(Resouce res,int id) 用于根据给定的资源ID从指定的资源中解析
decodeStream(InputStream is) 用于从指定的输入流中解析

compress(Bitmap.CompressFormat format,int quality,Outputstream stream)
用于将Bitmap对象压缩为指定格式并保留到指定的文件输出流中,其中format参考值可以是
Bitmap.compressFormat.PNG,Bitmap.compressFormat.JPEG,.compressFormat.WEBP
createBitmap(Bitmap source) 使用位图对象创建新的位图对象
createBitmap(Bitmap source,int x,int y,int width,int height); 用于从源位图的指定坐标点开始,挖取指定宽度和高度的一块图像来创建新的Bitmap对象
createBitmap(Bitmap source,int x,int y,int with,int height,Matrix matrix,boolean filter) 用于从源位图的指定坐标点,“挖取”指定宽度和高度的一块图像来创建新的Bitmap对象,并按Matrix指定规则进行变换
createBitmap(int width,int height,Bitmap.Config config) 用于创建一个指定宽度高度的新的Bitmap对象
createScaledBitmap(Bitmap source,int dstwidth,int dstheight,,boolean filter) 用于将源位图缩放为指定宽度和高度的新的Bitmap对象
createBitmap(int colors[],int width,int height,Bitmap.Config) 用指定的颜色数组,创建一个指定宽度和高度的Bitmap对象,数组元素的个数为width*height
isRecycled() 用于判断图片是否被回收
recycle() 回收图片
Bitmap 和 Drawable之间的转换
Drawable转化为Bitmap
public static Bitmap drawableToBitmap(Drawable drawable) {
    int width = drawable.getIntrinsicWidth();
    int height = drawable.getIntrinsicHeight();
    drawable.setBounds(0, 0, width, height);

    Bitmap bitmap = Bitmap.createBitmap(width, height, drawable.getOpacity() != PixelFormat.OPAQUE ? Bitmap.Config.ARGB_8888 : Bitmap.Config.RGB_565);
    Canvas canvas = new Canvas(bitmap);

    drawable.draw(canvas);
    return bitmap;
}

private void drawableToBitamp(Drawable drawable){
    BitmapDrawable bd = (BitmapDrawable) drawable;
    bitmap = bd.getBitmap();
}
|
Bitmap 转换为 Drawable
public static Drawable bitmapToDrawble(Bitmap bitmap,Context mcontext){
    Drawable drawable = new BitmapDrawable(mcontext.getResources(), bitmap);
    return drawable;
}
|
Matrix图像变换
我们在介绍Paint的时候接触到了ColorMatrix,它是一个颜色矩阵用于颜色变换的,这里需要介绍的是图像变换矩阵:
图像变换常见的有如下几种:
1.平移变化 matrix.setTranslate
2.缩放变化 matrix.setScale
3.旋转变化 matrix.setRotate
4.倾斜变化 matrix.setSkew
运用上述的方式会重置所有的值,只设置当前的变化,所以不会变化不会累加。
如果需要累加变化则需要使用postXXXX和preXXXX
postXXXX 是会在前面的变化结束后叠加post的动画
而preXXXX是会在当前的变化前叠加pre的动画
如果上述的还不能满足我们的要求,我们还可以直接设置矩阵值:
float[] matrixArray = new float[9];
Matrix matrix = new Matrix();
matrix.setValues(matrixArray);
|
同样我们在使用上述的几种便捷方式设置好变换矩阵后还可以通过下面的方式获得矩阵的值:
float[] matrixValues = new float[9];
matrix.getValues(matrixValues);
|
那么如何应用到实际的图像中呢?
还记得前面介绍Canvas.drawBitmap把这里就有一个需要Matrix,还有一个是在创建Bitmap的时候,这里就不写了,大家可以看看前面的内容。

