Espresso 文档

Espresso 帮助文档

Espresso 环境搭建

在Android Studio 2.2中Expresso是默认引入的,你会发现在新创建的Android studio项目的build.gradle中已经帮我们添加好了如下的依赖,
并且已经帮我们创建好了androidTest目录,之前是没有这个待遇的,所以如果你还在为搭建环境困扰,不要纠结了升级你的Android Studio吧。

// Android JUnit Runner
androidTestCompile 'com.android.support.test:runner:0.5'
// JUnit4 Rules
androidTestCompile 'com.android.support.test:rules:0.5'
// Espresso core
androidTestCompile 'com.android.support.test.espresso:espresso-core:2.2.2'
// Espresso-contrib for DatePicker, RecyclerView, Drawer actions, Accessibility checks, CountingIdlingResource
androidTestCompile 'com.android.support.test.espresso:espresso-contrib:2.2.2'
// Espresso-web for WebView support
androidTestCompile 'com.android.support.test.espresso:espresso-web:2.2.2'
// Espresso-idling-resource for synchronization with background jobs
androidTestCompile 'com.android.support.test.espresso:espresso-idling-resource:2.2.2'

当然如果你们公司不能上网那么只能下载如下的jar包存在对应的libs中:
自动化测试静态jar包

一定要注意需要添加 defaultConfig 节点添加

testInstrumentationRunner "android.support.test.runner.AndroidJUnitRunner"

否则会遇到明明编写了测试用例,但是还是报没有测试项的错误:

Espresso 组成

Expresso 是由三大部分组成的:

ViewMachers:寻找用来测试的View
ViewActions:发送交互事件。
ViewAssertions:检验测试结果。

上述的操作可以简单归结为定位到某个控件,对某个空间执行某项操作,检查操作结束后的结果。

下面是Espresso的CheetSheet
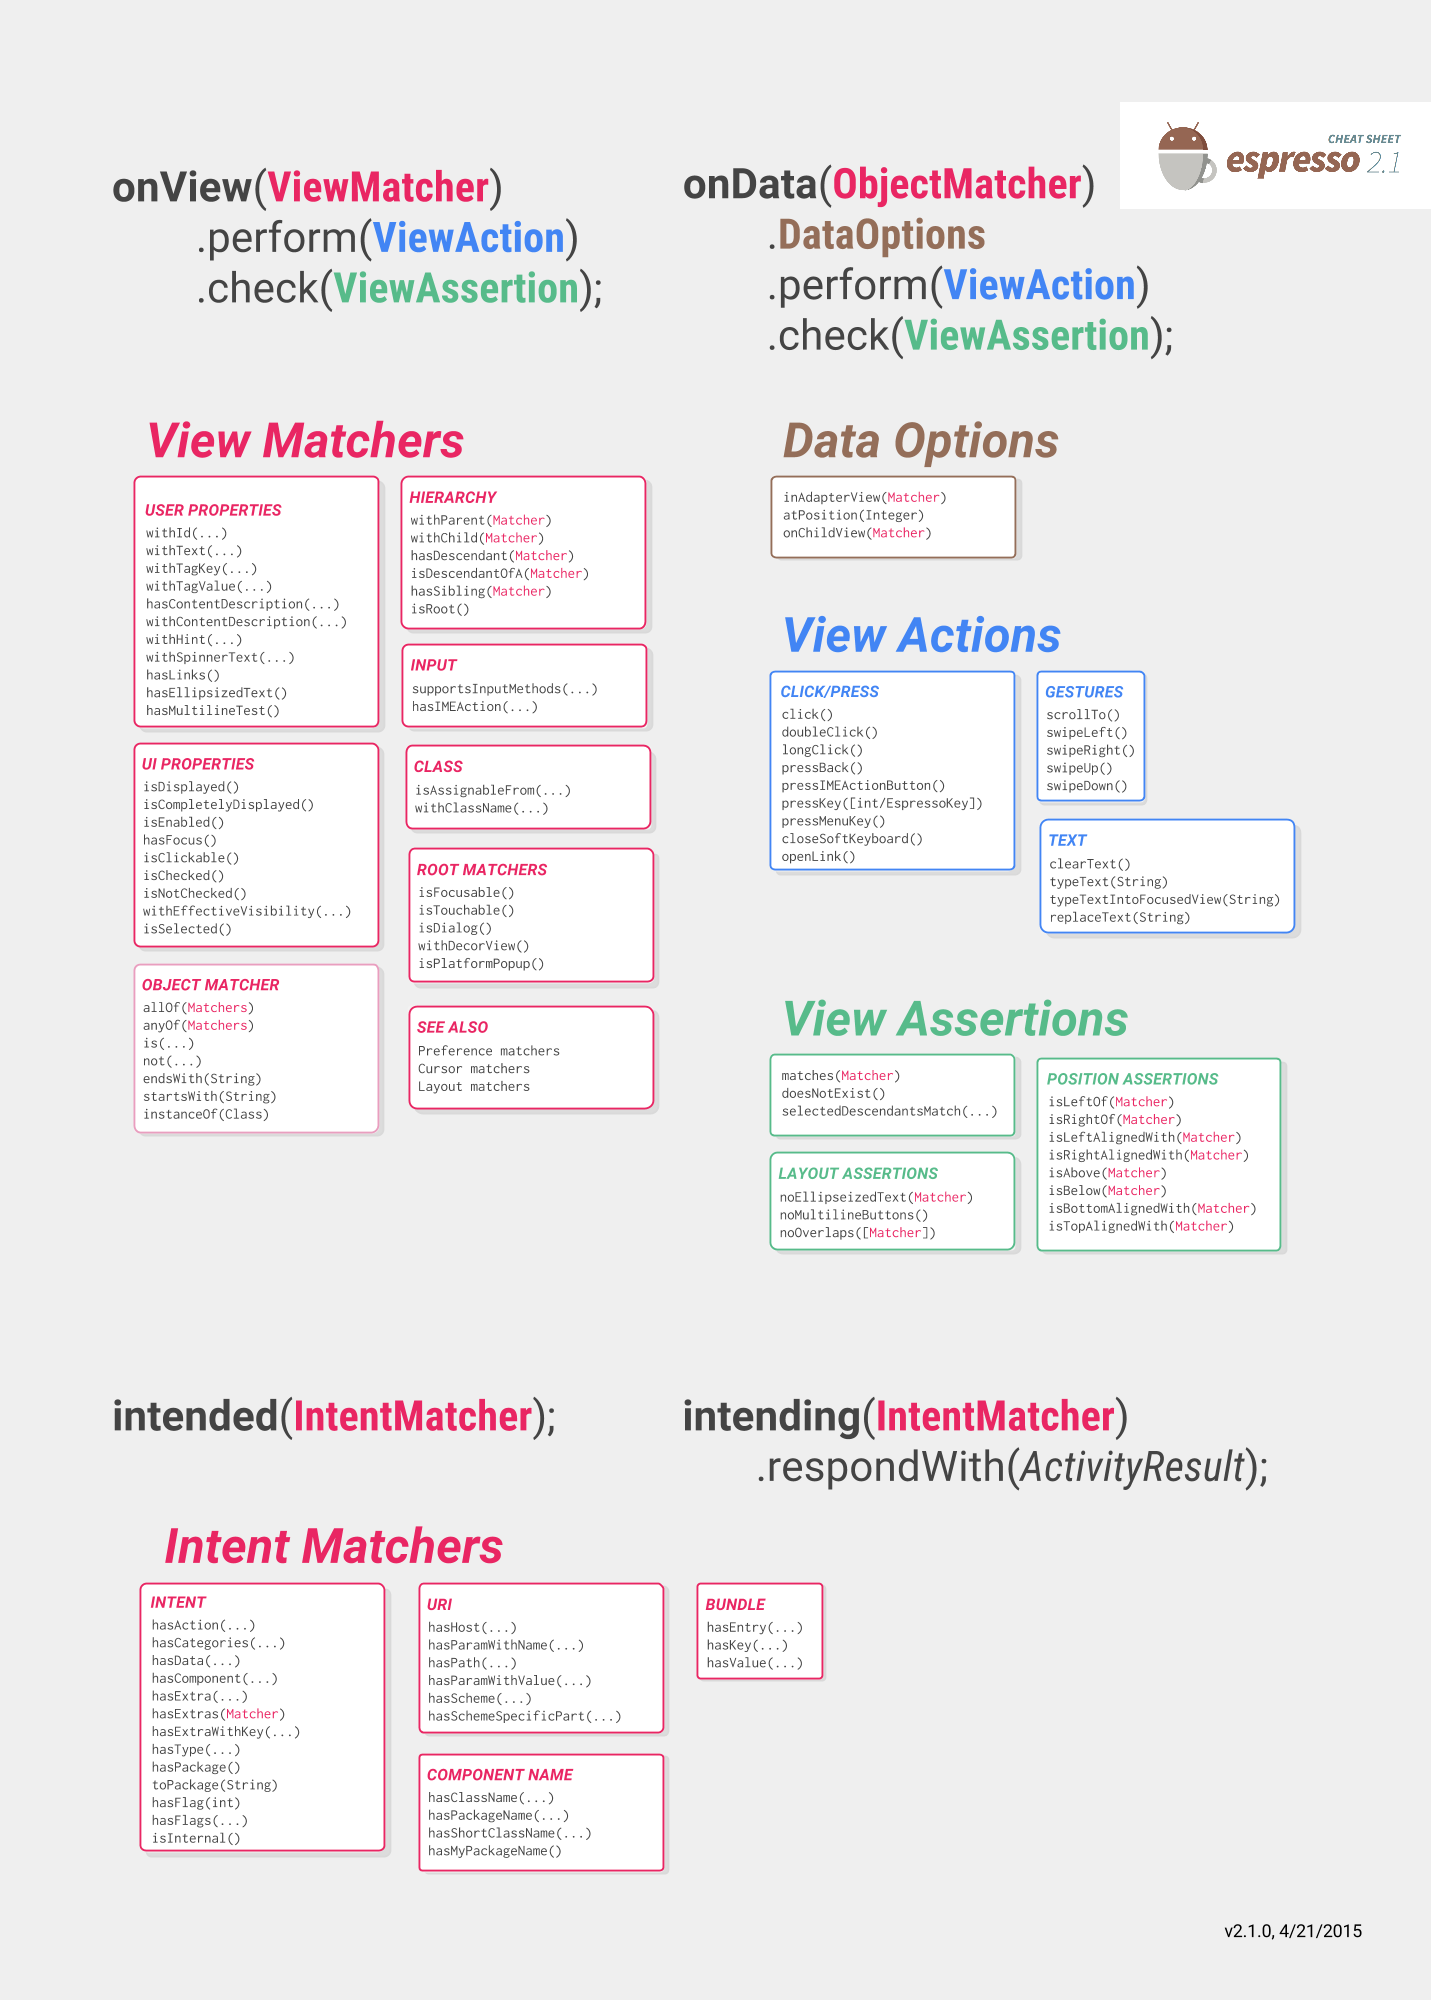
ActivityTestRule

在开始自动化测试之前都会定义一个ActivityTestRule 它用于在测试的时候launch待测试的activity。Rules会在每个测试方法执行的时候执行,并且优先于 @Before方法。使用ActivityTestRule还能通过ActivityTestRule#getActivity()方法来获取某个activity的引用。

查找待操作的View

从上面的Espresso CheetSheet中可以看出查找视图可以用onView 和 onData两个方法,整体来说,onView()比较适用于UI比较简单的情况,一般我们获取这些简单的View可以通过id,text,Discription,Hint等属性来获取。但是需要注意的是上面的onView所找到的应该只能有一项,不能有多个View满足给出的条件,否则会报出AmbiguousViewMatcherException,如果遇到这种情况可以有两种方式一种是使用allof来添加多个条件来重新定位,另一个是找到具体的那个父View然后再定位。
但是,对于类似ListView, GridView, Spinner这种有UI复用的元素来说,,可能只有一部分显示在了屏幕上,对于没有显示在屏幕上的那部分数据,我们通过onView()是没有办法找到的。onView就不能胜任了只能借助onData来完成。

我们首先对比下onView和onData两个方法:

从返回值角度来看:

  • onView返回的是ViewInteraction,它是一个符合匹配条件的唯一目标控件
  • onData返回的是DataInteraction,它关注于数据。
    从传入参数角度来看:
  • onView 传入的是Matcher 它是一个View匹配的匹配规则
  • onData 传入的是Matcher<? extends Object> 它是针对数据匹配的匹配规则

也就是说onView偏向于直接匹配视图,而onData由于有些视图不能完全显示所以偏向于从数据入手。也就是Adapter对应的Data入手

在AdapterView中点击某项的例子:

先上代码:

public class ItemMatcher {
public static Matcher<Object> withName(final String name) {
return new BoundedMatcher<Object,ItemInfo>(ItemInfo.class) {
@Override
public void describeTo(Description description) {
description.appendText("item mathcher");
}

@Override
protected boolean matchesSafely(ItemInfo item) {
if(item != null && !TextUtils.isEmpty(item.getName()) && item.getName().equals(name)) {
return true;
}
return false;
}
};
}
}

@RunWith(AndroidJUnit4.class)
@LargeTest
public class MainActivityTest {

@Rule
public ActivityTestRule<MainActivity> mActityTestRule = new ActivityTestRule<MainActivity>(MainActivity.class);

@Test
public void testScroller() {
onData(allOf(instanceOf(ItemInfo.class), ItemMatcher.withName("Jimmy 999")))
.inAdapterView(withId(R.id.listviews))
.onChildView(withId(R.id.name))
.perform(click());
}
}

在上面我们使用了onData来在数据集中查找,这里最重要的就是自定义的ItemMatcher,通过它可以找到name为”Jimmy 999”的那一项,在有多个ListView的时候可以使用inAdapterView来指定要查找的listView。找到之后会自动滚动到哪一项,执行点击操作。

public void testClickSpecialItem() {
onData(instanceOf(ItemInfo.class))
.inAdapterView(allOf(withId(R.id.listviews), isDisplayed()))
.atPosition(99)
.onChildView(withId(R.id.name))
.perform(click());
}

当然并不是所有的AdapterView都像上面那么复杂比如点击某项Spinner可以使用如下方式:

onData(allOf(is(instanceOf(String.class)),is("xxxx"))).perform(click());

在googlesample中给出的一个测试SimpleAdapter的例子如下:

@RunWith(AndroidJUnit4.class)
@LargeTest
public class TestSimpleAdapter {
private static final String TEXT_ITEM_50 = "item: 95";
@Rule
public ActivityTestRule<MainActivity> mActivityRule = new ActivityTestRule<>(MainActivity.class);
@Test
public void testCheckBoxClick() {
onRow(TEXT_ITEM_50).onChildView(withId(R.id.checkbox)).perform(click());
onRow(TEXT_ITEM_50).onChildView(withId(R.id.checkbox)).check(matches(isChecked()));
}

public static DataInteraction onRow(String str) {
return onData(hasEntry(is(MainActivity.ROW_TEXT1),is(str)));
}
}
RecyclerView 的用法:

当要测试RecyclerView的时候需要添加如下依赖:

// Espresso-contrib for DatePicker, RecyclerView, Drawer actions, Accessibility checks, CountingIdlingResource
androidTestCompile 'com.android.support.test.espresso:espresso-contrib:2.2.2'

这个不是默认添加的所以需要自己添加。并且这个库的某些依赖和support有冲突需要使用移除部分,也可以考虑上面说的离线的方式添加对应的jar包。

@Test
public void testrecycleView() {

onView(withId(R.id.recycleviews)).perform(RecyclerViewActions.actionOnItemAtPosition(909, click()));

onView(withId(R.id.recycleviews)).perform(RecyclerViewActions.actionOnItem(hasDescendant(withText("Name
999")), click()));

onView(withId(R.id.recycleviews)).perform(RecyclerViewActions.actionOnHolderItem(new
CustomViewHolderMatcher(hasDescendant(withText("Name 999"))), click()));

}

private static class CustomViewHolderMatcher extends TypeSafeMatcher<RecyclerView.ViewHolder> {
public CustomViewHolderMatcher() {
}
public CustomViewHolderMatcher(Matcher<View> viewMatcher) {
itemMatcher = viewMatcher;
}
private Matcher<View> itemMatcher = any(View.class);
@Override
protected boolean matchesSafely(RecyclerView.ViewHolder viewHolder) {
return MainActivity2.ItemBeanAdapter.MyViewHolder.class.isAssignableFrom(viewHolder.getClass())
&& itemMatcher.matches(viewHolder.itemView);
}
@Override
public void describeTo(Description description) {
description.appendText("this is assigned from view holder");
}
}
hasSibling的用法

Sibling 的意思是 兄弟,姐妹;[生]同科,同属;[人]氏族成员
比如我们有一个ListView每一项都有一个显示“70”的TextView,这些TextView的text属性和id都是相同的,但是每一个TextView左边都放置有不同的TextView。如下图所示,此时可以通过如下的代码出目标项:

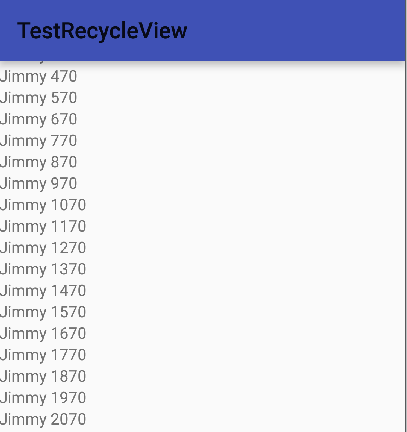
onView(allOf(withText("70"), hasSibling(withText("Jimmy: 12"))))
.perform(click());

这里需要注意的是这些项必须是在屏幕上可见的。

inRoot 验证Toast && AutoComplete

这个很简单就是判断Toast时候在Root之上。

onView(withText("Position = 99"))
.inRoot(withDecorView(not(mActityTestRule.getActivity().getWindow().getDecorView())))
.check(matches(isDisplayed()));

自定义ViewAction

一般我们要执行某个操作都是针对某个匹配的View的所以我们一般作为参数的都是Matcher,里面使用Matcher找到空间并添加ViewAction 在perform方法中会传入对应的View可以根据这个传入的View对其进行操作
下面是两个自定义的ViewAction:getText 会从View中获取文本,changeTextColor会改变文本的颜色。

public String getText (Matcher<View> matcher) {
final String[] textStr = {null};
onView(matcher).perform(new ViewAction() {
@Override
public Matcher<View> getConstraints() {
return isAssignableFrom(TextView.class);
}
@Override
public String getDescription() {
return "get text from TextView";
}
@Override
public void perform(UiController uiController, View view) {
textStr[0] = ((TextView) view).getText().toString();
}
});
return textStr[0];
}
public void changeTextColor(Matcher<View> matcher) {
onView(matcher).perform(new ViewAction() {
@Override
public Matcher<View> getConstraints() {
return isAssignableFrom(TextView.class);
}
@Override
public String getDescription() {
return "Change text Color";
}
@Override
public void perform(UiController uiController, View view) {
((TextView)view).setTextColor(Color.parseColor("#ff0000"));
}
});
}

要输入中文可以使用如下的方式:
onView(withId(R.id.imputString)).perform(replaceText(“各种格式文件”));
对于一般的View我们可以使用onView来定位,但是对于AdapterView(ListView GridView Spinner都是属于AdapterView)就需要onData来进行定位。

自定义Idling Resource

Idling Resource 用于需要等待异步计算或I/O操作完成的情况。使用它Espresso会等待app处于idle状态,才会执行下个动作和检查下个断言。

为了实现IdlingResource,需要重写3个函数:getName(),registerIdleTransitionCallback(),isIdleNow()。

* getName():必须返回代表idling resource的非空字符串,这个一般个人不做过多的纠结直接通过XXXX.class.getName()
* isIdleNow():返回当前idlingresource的idle状态。
* registerIdleTransitionCallback(IdlingResource.ResourceCallback callback) 用于注入回调。

下面是一个在网上找的比较典型的例子,就是主程序使用IntentService处理一个耗时操作,等到耗时操作结束的时候进行后续的测试

@Override
public String getName() {
return IntentServiceIdlingResource.class.getName();
}

@Override
public void registerIdleTransitionCallback(ResourceCallback resourceCallback) {
this.resourceCallback = resourceCallback;
}

@Override
public boolean isIdleNow() {
boolean idle = !isIntentServiceRunning();
if (idle && resourceCallback != null) {
resourceCallback.onTransitionToIdle();
}
return idle;
}

private boolean isIntentServiceRunning() {
ActivityManager manager = (ActivityManager) context.getSystemService(Context.ACTIVITY_SERVICE);
for (ActivityManager.RunningServiceInfo info : manager.getRunningServices(Integer.MAX_VALUE)) {
if (RepeatService.class.getName().equals(info.service.getClassName())) {
return true;
}
}
return false;
}
注册和注销idling resource

为了让Espresso等待自定义的idling resource,你需要注册它。在测试代码的@Before方法中执行注册,在@After中执行注销。

@Before
public void registerIntentServiceIdlingResource() {
Instrumentation instrumentation = InstrumentationRegistry.getInstrumentation();
idlingResource = new IntentServiceIdlingResource(instrumentation.getTargetContext());
registerIdlingResources(idlingResource);
}
@After
public void unregisterIntentServiceIdlingResource() {
unregisterIdlingResources(idlingResource);
}

Espresso Intent 测试

要测试Intent就必须使用到如下的库:

androidTestCompile 'com.android.support.test.espresso:espresso-intents:2.2'

这个库在上面介绍的离线库中也可以找到。

在使用Intent进行测试的时候需要首先明确两个方法:
intending and intended
intending 相当于 when ,respondWith 相当于 thenReturn。intending还有个用法是用于检查返回的Intent携带的参数
intended 用于验证某个Intent是否被发送。
在使用这两个方法的时候必须先初始化Intents。用完后必须调用release释放。

  • 检测某个Intent是否发送成功
private Matcher<Intent> expectedIntent;
@Rule
public final ActivityTestRule<MainActivity> rule =
new ActivityTestRule<>(MainActivity.class);
@Before
public void setupIntents() {
expectedIntent = allOf(toPackage(InstrumentationRegistry.getTargetContext().getPackageName()),isInternal());
}
@Test
public void testLoginIntent() {
Intents.init();
onView(withId(R.id.button_login)).perform(click());
intended(expectedIntent);
Intents.release();
}
  • 检测某个Intent 发送后的响应是否正确:

有的时候我们会按下某个按钮发送一个Intent来获取某个结果,这个结果一般在onActivityResult中返回。如果要测试返回某个结果时候的情况可以使用如下的代码来验证

public void testLoginPass() {
//创建一个响应的ActivityResult
Instrumentation.ActivityResult activityResult = new Instrumentation.ActivityResult(
Activity.RESULT_OK, new Intent());
//Intent初始化
Intents.init();
//将activityResult与待发送的expectedIntent绑定
intending(expectedIntent).respondWith(activityResult);
//执行操作
onView(withId(R.id.button_login)).perform(click());
//验证是否发送成功
intended(expectedIntent);
//释放Intent
Intents.release();
//检验返回activityResult时的现象是否正确
onView(withId(R.id.button_login)).check(matches(withText(R.string.pass_login)));
}

  • 验证发送出去的数据
    Intent 一般会携带一些数据我们可以通过hasExtra来检查是否发送带有特定键值的数据,

    @Test
    public void testLoginSuccess() throws InterruptedException {

    onView(withId(R.id.email)).perform(typeText(TEST_USER));
    onView(withId(R.id.password)).perform(typeText(TEST_PASS));
    closeSoftKeyboard();
    Intents.init();
    onView(withId(R.id.email_sign_in_button)).perform(click());
    //等待20
    TimeUnit.SECONDS.sleep(20);
    //检验返回的数据
    intending(hasExtra(MainActivity.LOGIN_NAME, TEST_USER));
    Intents.release();
    }

    Espresso中提供了许多方法用于检测Intent的各个部分,下面是每个字段的对应关系

    Intent.setData <–> hasData
    Intent.setAction <–> hasAction
    Intent.setFlag <–> hasFlag
    Intent.setComponent <–> hasComponent
  • 发送一个带有数据的Intent检验返回的结果

    @Before
    public void setupImageUri() {

    Resources resources = InstrumentationRegistry.getTargetContext().getResources();
    Uri imageUri = Uri.parse(ContentResolver.SCHEME_ANDROID_RESOURCE + "://" + resources
    .getResourcePackageName(
    R.mipmap.ic_launcher) + '/' + resources.getResourceTypeName(
    R.mipmap.ic_launcher) + '/' + resources.getResourceEntryName(
    R.mipmap.ic_launcher));
    Intent resultData = new Intent();
    resultData.setData(imageUri);
    //创建一个Intent响应结果
    mActivityResult = new Instrumentation.ActivityResult(
    Activity.RESULT_OK, resultData);
    }

    @Test
    public void testSelectImage() {

    //Check the image is not displayed
    onView(withId(R.id.imageView)).check(matches(not(hasDrawable())));
    //Setup the intent
    Intents.init();
    //将响应结果绑定到具有如下条件的Intent上
    Matcher<Intent> expectedIntent = allOf(hasAction(Intent.ACTION_PICK),
    hasData(android.provider.MediaStore.Images.Media.EXTERNAL_CONTENT_URI));
    intending(expectedIntent).respondWith(mActivityResult);

    //执行操作触发满足上述条件的Intent
    onView(withId(R.id.fab_image)).perform(click());
    //检验是否发送成功
    intended(expectedIntent);
    Intents.release();

    //Check the image is displayed
    onView(withId(R.id.imageView)).check(matches(hasDrawable()));

    }
  • 测试启动Activity的Intent:
    首先要设置不启动Activity

    @Rule
    public final ActivityTestRule<TextHashActivity> rule =
    new ActivityTestRule<>(TextHashActivity.class, false,
    false); // not launch the activity
    @Test
    public void testCorrectIntent() throws InterruptedException {
    //设置启动Activity的Intent
    Intent intent = new Intent();
    intent.setAction(Intent.ACTION_SEND);
    intent.setType(TextHashActivity.SUPPORT_TYPE);
    intent.putExtra(Intent.EXTRA_TEXT, TEST_INPUT);
    //启动Activity
    rule.launchActivity(intent);

    TimeUnit.SECONDS.sleep(1);
    onView(withId(R.id.textview_sha1))
    .check(matches(withText(TEST_SHA1)));
    }

    另一种方式测试:

@Test
public void testFromOtherApp() throws InterruptedException {

Intent intent = new Intent();
intent.setAction(Intent.ACTION_SEND);
intent.setFlags(Intent.FLAG_ACTIVITY_NEW_TASK);
intent.setType(TextHashActivity.SUPPORT_TYPE);
intent.putExtra(Intent.EXTRA_TEXT, TEST_INPUT);

// There maybe more than one app will handle this requirement
String packageName = InstrumentationRegistry.getTargetContext().getPackageName();
ComponentName componentName = new ComponentName(packageName,
TextHashActivity.class.getName());
intent.setComponent(componentName);

Intents.init();
InstrumentationRegistry.getContext().startActivity(intent);
Matcher<Intent> expectedIntent = hasComponent(componentName);
intended(expectedIntent);
Intents.release();

TimeUnit.SECONDS.sleep(1);
onView(withId(R.id.textview_sha1))
.check(matches(withText(TEST_SHA1)));
}
  • 想让每个Activity启动的时候都收到某个Intent

    @SmallTest
    @RunWith(AndroidJUnit4.class)
    public class MainActivityTest {
    @Rule
    public ActivityTestRule<MainActivity> mActivityRule =
    new ActivityTestRule<MainActivity>(MainActivity.class) {
    @Override
    protected Intent getActivityIntent() {
    Context targetContext = InstrumentationRegistry.getInstrumentation()
    .getTargetContext();
    Intent result = new Intent(targetContext, MainActivity.class);
    result.putExtra("Name", "Value");
    return result;
    }
    };

    }
  • 排除外部Intent的影响

intending(not(isInternal())).(new ActivityResult(Activity.RESULT_OK, null));

Espresso 测试用例中使用源码中的数据

要想在测试用例中使用源码中的数据可以使用VisibleForTesting 这个注释符。

@VisibleForTesting
public static final String VALID_ENDING = "coffee";

参考文章

http://michaelevans.org/blog/2015/09/15/testing-intents-with-espresso-intents/
https://github.com/pengj/Intent-Test
http://collectiveidea.com/blog/archives/2015/06/11/testing-for-android-intents-using-espresso/
https://segmentfault.com/a/1190000004338384
guides.codepath.com/android/UI-Testing-with-Espresso
http://www.jianshu.com/p/ad8b3514b852
https://segmentfault.com/a/1190000004355178
http://blog.csdn.net/qq744746842/article/details/51005604
http://stackoverflow.com/questions/32142463/how-to-stub-select-images-intent-using-espresso-intents
http://pengj.me/android/test/2015/10/17/expresso-test-intent.html

Contents
  1. 1. Espresso 文档
  2. 2. Espresso 环境搭建
  3. 3. Espresso 组成
    1. 3.1. ActivityTestRule
  4. 4. 查找待操作的View
    1. 4.1. 在AdapterView中点击某项的例子:
    2. 4.2. RecyclerView 的用法:
    3. 4.3. hasSibling的用法
    4. 4.4. inRoot 验证Toast && AutoComplete
  5. 5. 自定义ViewAction
  6. 6. 自定义Idling Resource
    1. 6.0.1. 注册和注销idling resource
  • 7. Espresso Intent 测试
  • 8. Espresso 测试用例中使用源码中的数据
  • 9. 参考文章