iOS开源库之coobjc使用
开源信息
![]()
coobjc 是由手淘架构团队推出的能在 iOS 上使用的协程开发框架,所以大家在了解coobjc之前必须先了解什么是协程,说到协程必定让人想起和它相关的两个概念进程和线程,
这里不会对这两个概念进行长篇大论,概括地讲对操作系统来说,线程是最小的执行单元,进程是最小的资源管理单元。进程负责开拓各个资源,线程共享这些资源,每个线程有单独的堆栈空间。并且无论进程还是线程,都是由操作系统所管理的。
而协程是用户态的微线程,协程不是被操作系统内核所管理,而完全是由程序所控制。
它的好处有哪些呢?
首先它可以以同步的方式写异步逻辑,可以避免“回调地域”现象,在性能方面调度性能更快,协程本身不需要进行内核级线程的切换,调度性能快,即使创建上万个协程也毫无压力。协程的使用以帮助开发减少锁、信号量的滥用。
对于经常进行高并发处理的服务端协程是很实用的。但是这不意味着移动端就不需要协程了。就iOS开发而言Objective C中基于Block 的异步编程回调也会照成比较常见的“回调地域”。如果具备同步方式编写异步代码可以极大地改善我们代码的逻辑结构,并且由于协程的引入也可以减少因为锁的使用带来的性能损耗。
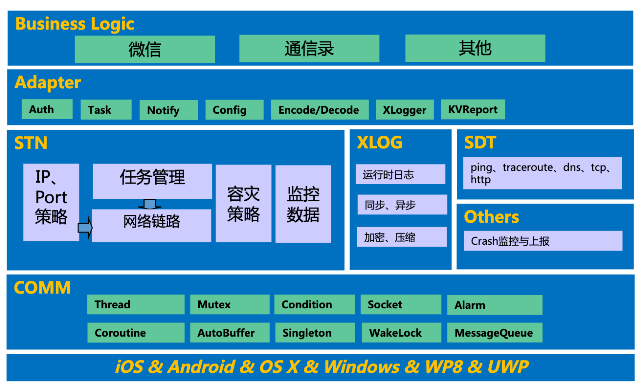
整体架构
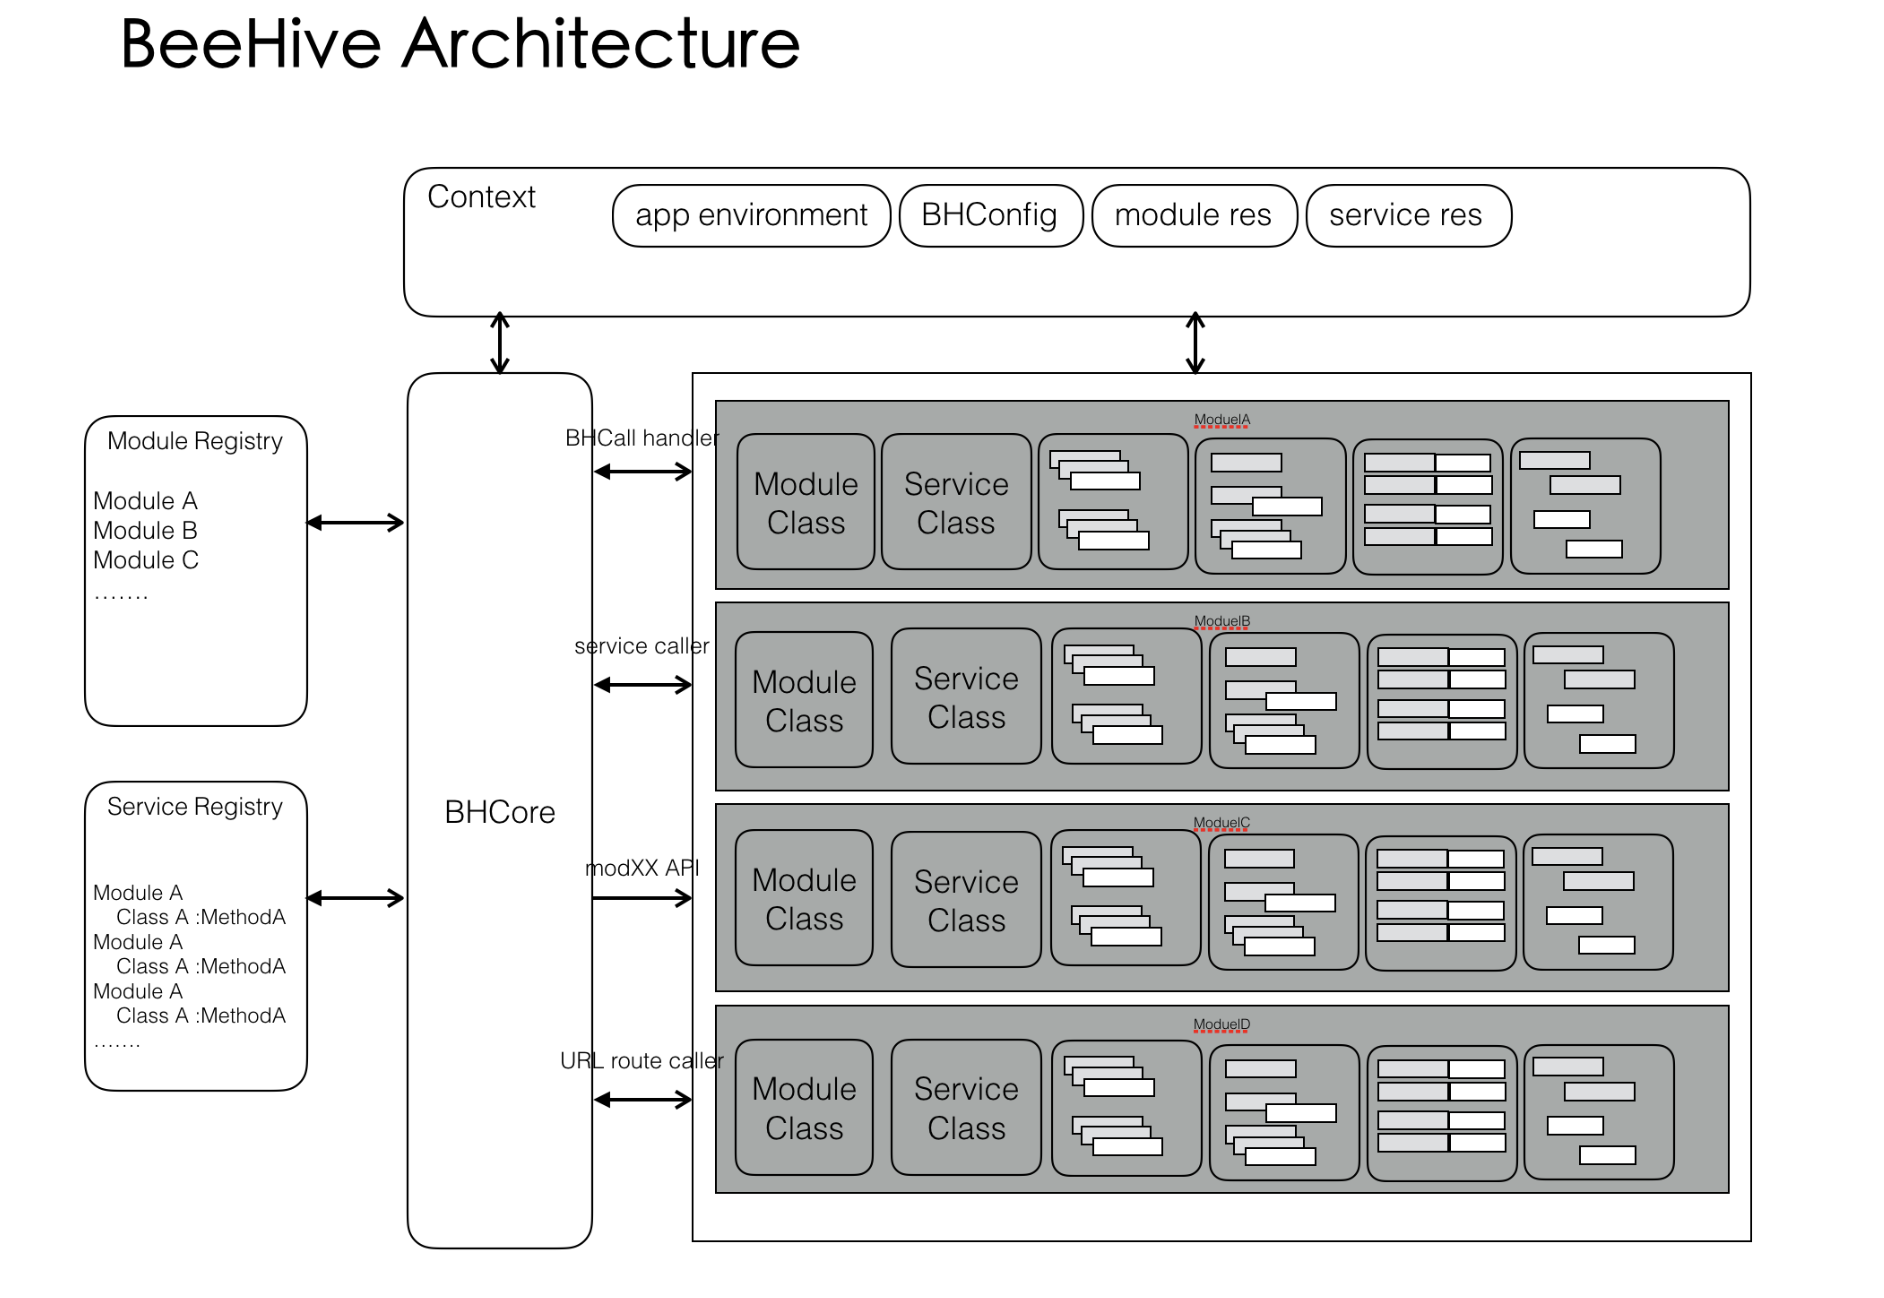
下面是coobjc的整体架构图:
底层是协程的核心,包括堆栈切换管理,协程调度,协程之间channel通信实现。 |
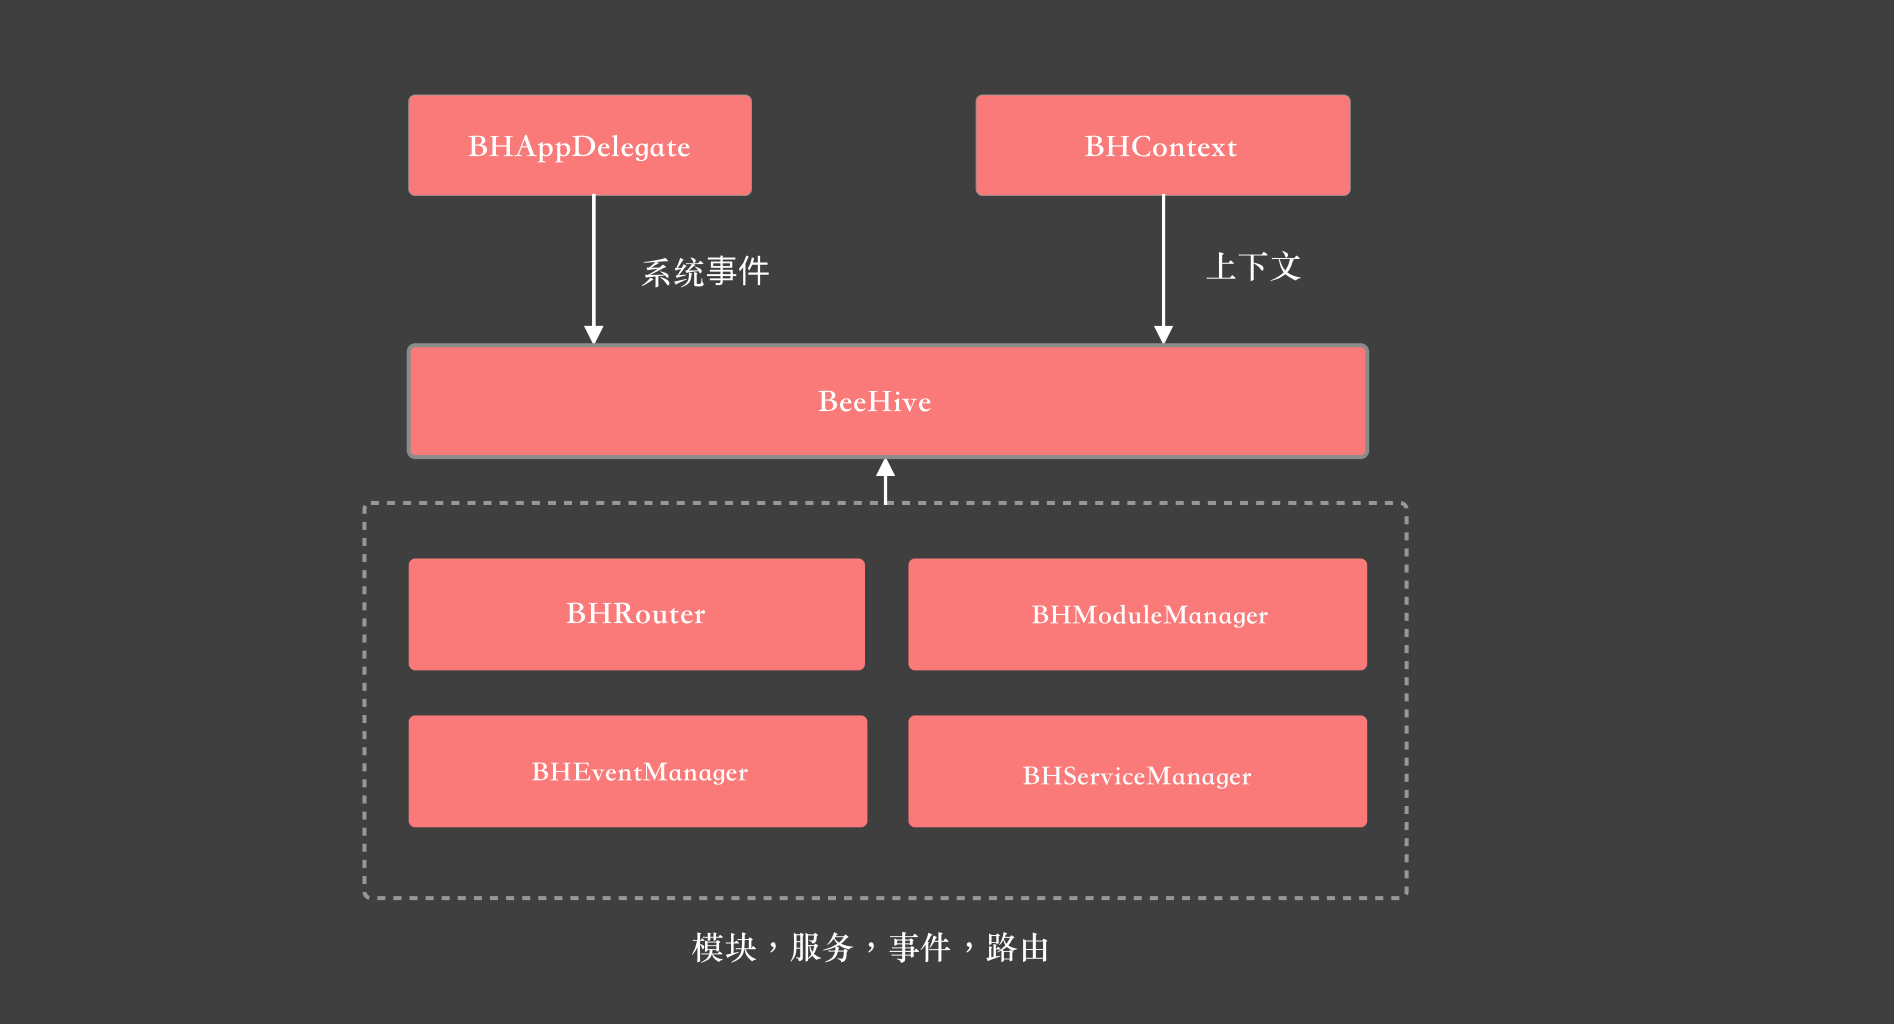
coobjec中每个协程都是可以暂停和恢复的,并且每个协程都分配一个单独的内存区域用于存储它的调用栈,它有四个状态分别是:READY,RUNNING,SUSPEND,DEAD,并且在运行过程中可以多次在RUNNING,SUSPEND状态之间进行切换。
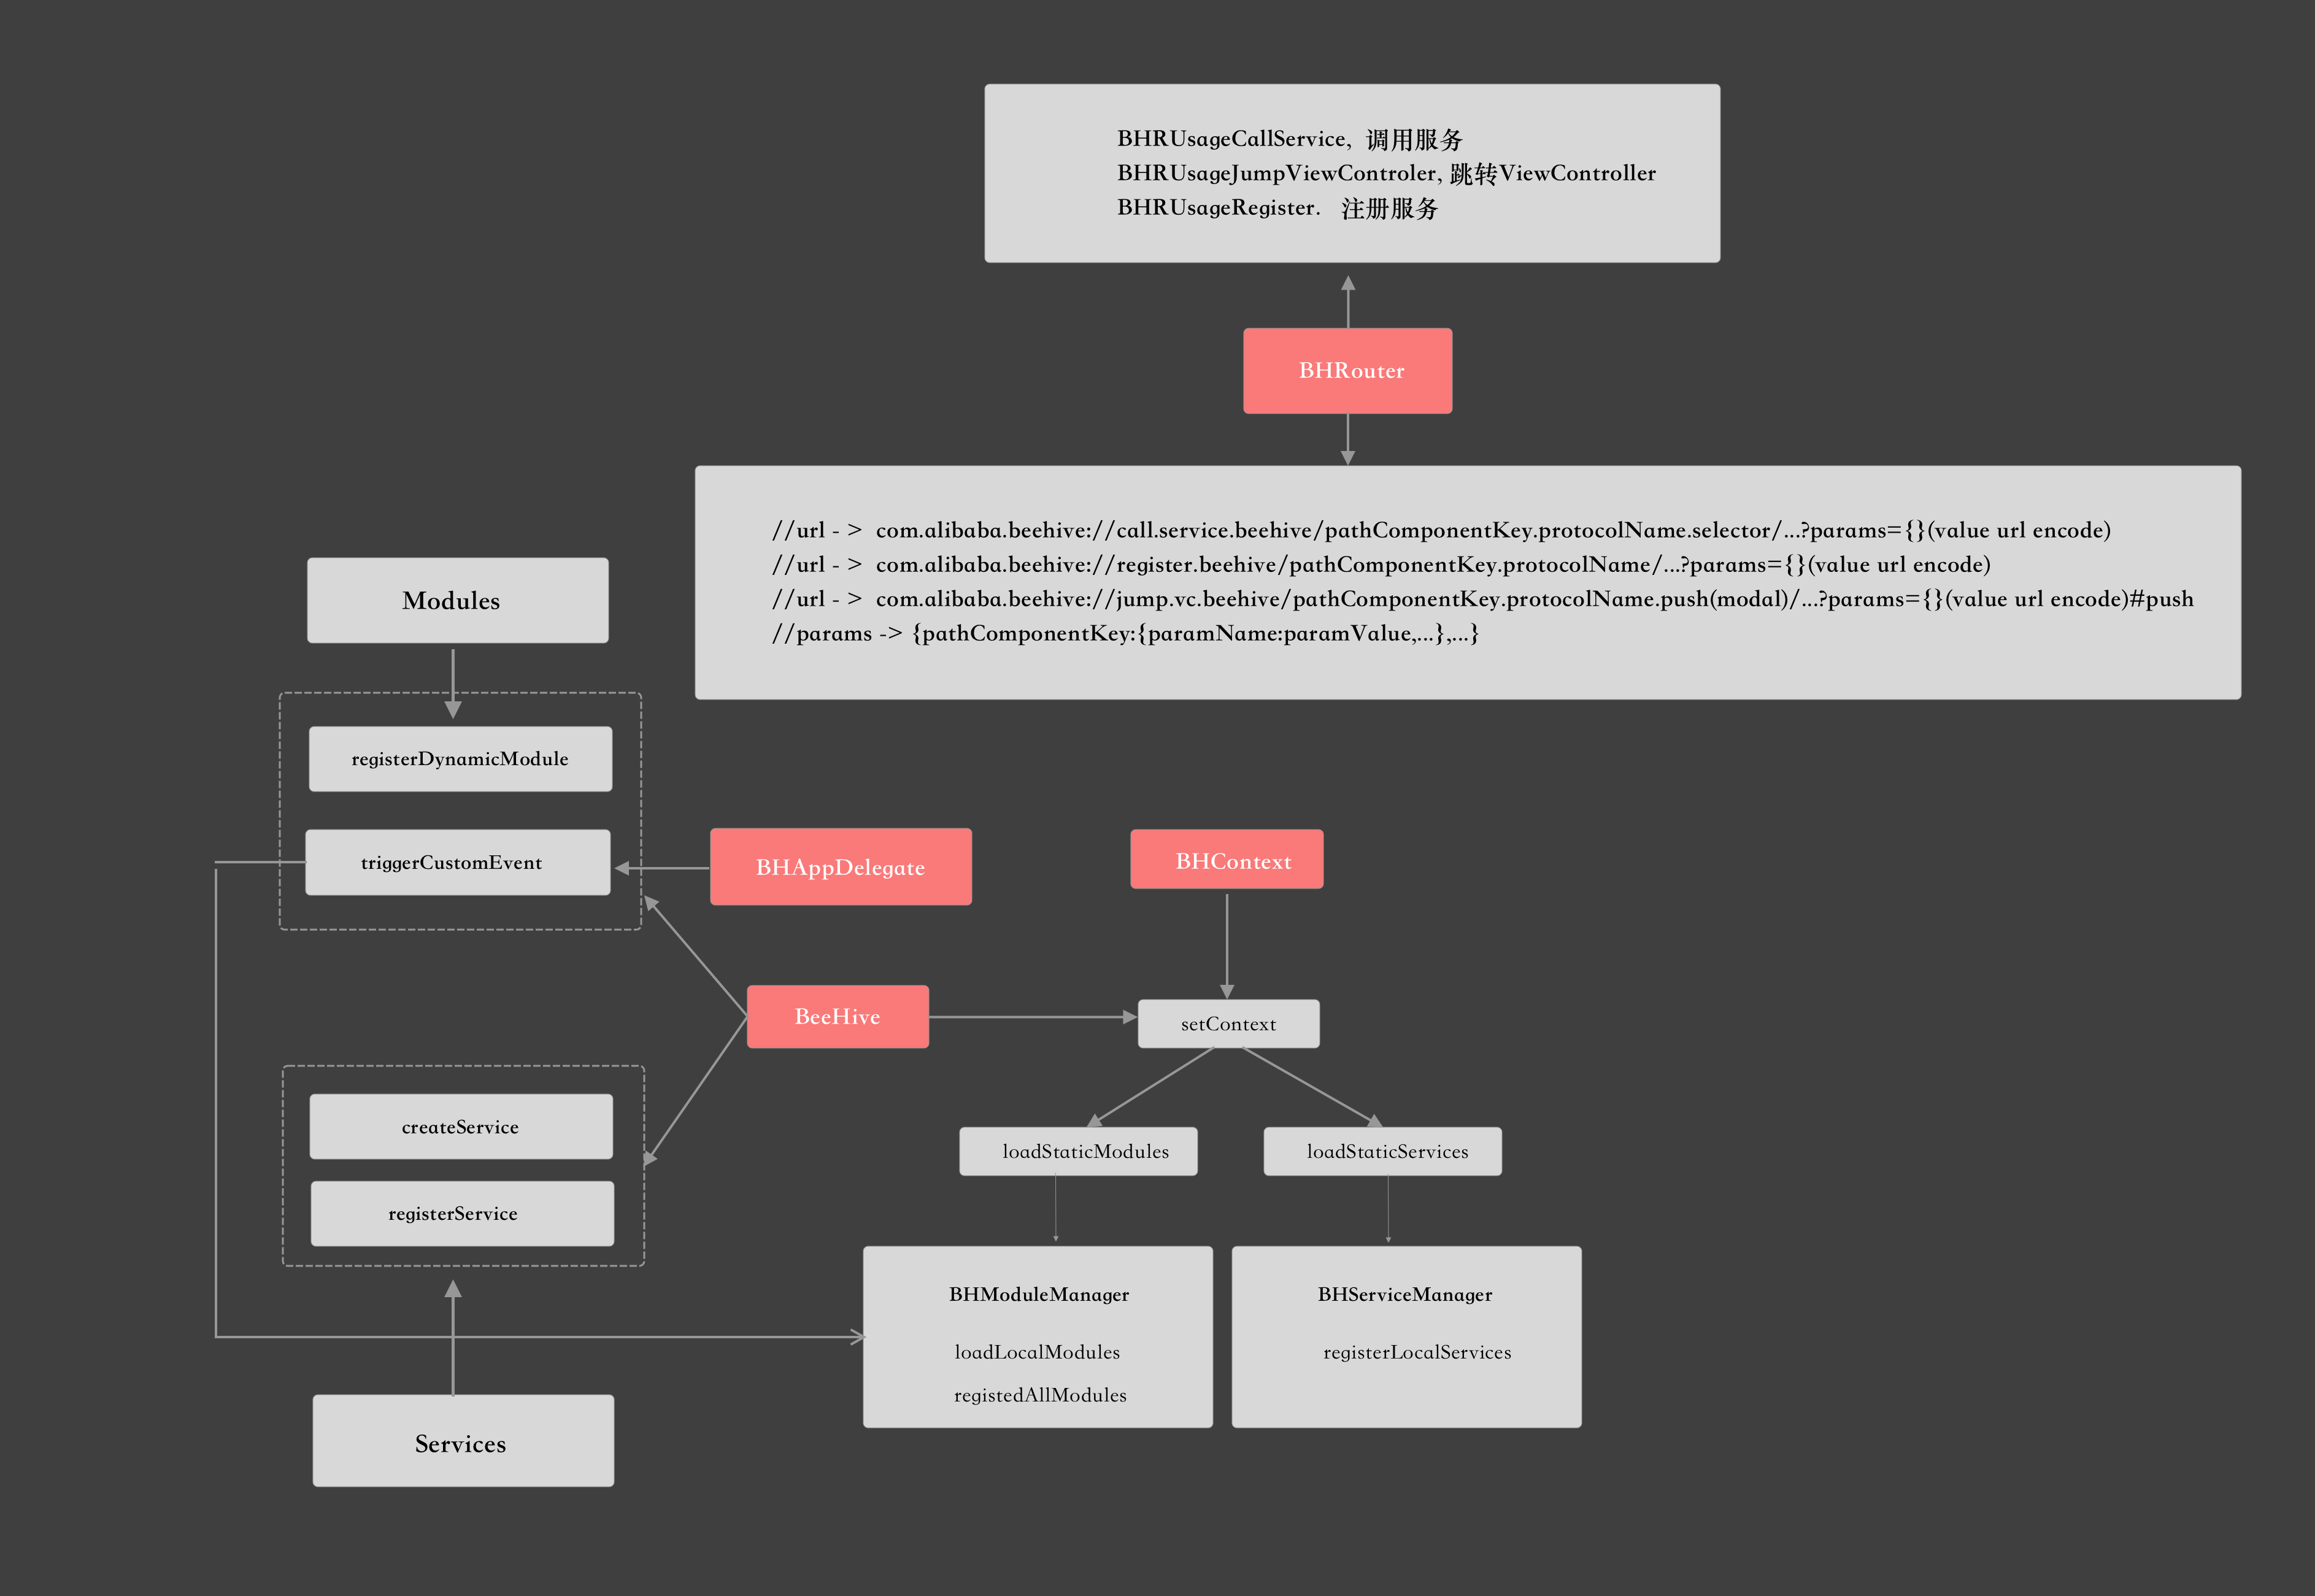
下面是协程进行yield和resume操作的示意图:
coobjc内部使用一个调度器来负责用户所有协程的调度,它实际上是通过一个协程队列来进行管理,调度器会不断从队列中取出协程去执行。一旦队列中没有协程可以执行的时候,会切换到线程执行。所以当我们需要执行某个协程的时候,我们只需要将协程添加到某个线程的调度器队列中就可以了。
调度器负责执行它。

话不多说我们来看下coobjc的具体用法:
coobjc 的使用
1 创建协程
coobjc可以在当前线程或者指定的queue创建协程,在哪里创建就会在哪个线程进行调度,当然还可以在指定的队列创建和运行协程。
co_launch(^{ |
2 取消协程
在coobjc中协程是可取消的,ObjC不建议使用异常,所以coobjc中不使用异常来取消协程。要取消协程可以调用CCOCoroutine的cancel方法。通过co_isCancelled宏来查询当前协程是否被取消了。
CCOCoroutine *co = co_launch(^{ |
在调用cancel后,协程的内部代码将不再继续执行,协程的内存将会被释放。
3. COPromise用法
await主要用于避免回调地狱现象,有时候我们会遇到请求两个不相关的数据接口后,将最终的数据组合后作为最终数据返回。如果不借助await的话,只能分别串行请求后最后将数据组合,这样会显得很低效。借助协程可以同时并行执行然后将数据合并。
- 定义一个COPromise,在COPromise中通过fulfill 返回成功的结果,通过reject 返回失败的结果。返回的错误信息可以通过co_getError来获取。
fulfill
- (COPromise *)testPromiseFullfill { |
reject
- (COPromise *)testPromiseReject { |
fullfill && reject
- (COPromise *)testPromiseRejectFullfile { |
cancel
- (COPromise *)testPromiseCancel { |
then
co_launch(^{ |
批量等待
co_launch(^{ |
我们来看下COPromise的一些关键属性和方法:
关键属性:
/** |
关键构造方法:
/** |
关键方法:
/** |
/** |
4.COProgressPromise用法
static COProgressPromise* progressDownloadFileFromUrl(NSString *url){ |
上述的这些co_launch都可以在任何子线程中运行。
5. COChan用法
COChan 主要用于协程之间进行数据传输,它有阻塞和非阻塞两种方式收发数据,针对channel,可以有无缓存类型,有缓存类型,以及无限缓存类型,下面会进行详细介绍。
和Promise类似的用法:
- (COChan<id> *)co_fetchSomething { |
作为生产者消费者的用法:
COChan *chan = [COChan chanWithBuffCount:10]; |
当COChan容量为0的时候,发送数据是阻塞的,只有在有人接收数据后才会执行send之后的代码
COChan *chan = [COChan chanWithBuffCount:0]; |
上面数字代表的是代码的执行顺序。
当将COChan容量改为非0的时候执行顺序如下:
COChan *chan = [COChan chanWithBuffCount:2]; |
如果COChan中没有数据的时候调用receive将会阻塞:
__block NSInteger step = 0; |
也就是send方法会往COChan中通道缓存中添加消息,如果满的话则会阻塞,直到数据被receive之后,才会继续执行。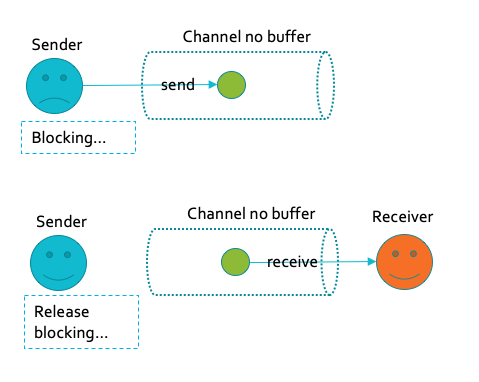
receive会不断从通道缓存中获取数据,如果数据被取完后就阻塞,直到有数据send到缓存的时候,才会继续执行。这是很典型的生产者消费者模型。
send_nonblock会完缓存通道送数据后立刻返回,如果缓存满了就会丢弃数据,不会阻塞。看下coobjc给出的两个测试用例:
it(@"send non blocking will not block the coroutine.", ^{ |
我们看下接收被阻塞的例子:
it(@"receive can block muti coroutine.", ^{ |
上面的例子中缓存通道容量都是指定的,还可以使用可扩展的通道expandableChan:
it(@"expandableChan will not abandon values.", ^{ |
在进入下一个主题之前我们先回顾下OCChannel接口:
构造方法:
/** |
往通道发送数据:
/** |
接收数据
/** |
6. COActor用法
Actor 的概念来自于 Erlang ,在 AKKA 中,可以认为一个 Actor 就是一个容器,用以存储状态、行为、Mailbox 以及子 Actor 与 Supervisor 策略。Actor 之间并不直接通信,而是通过 Mail 来互通有无
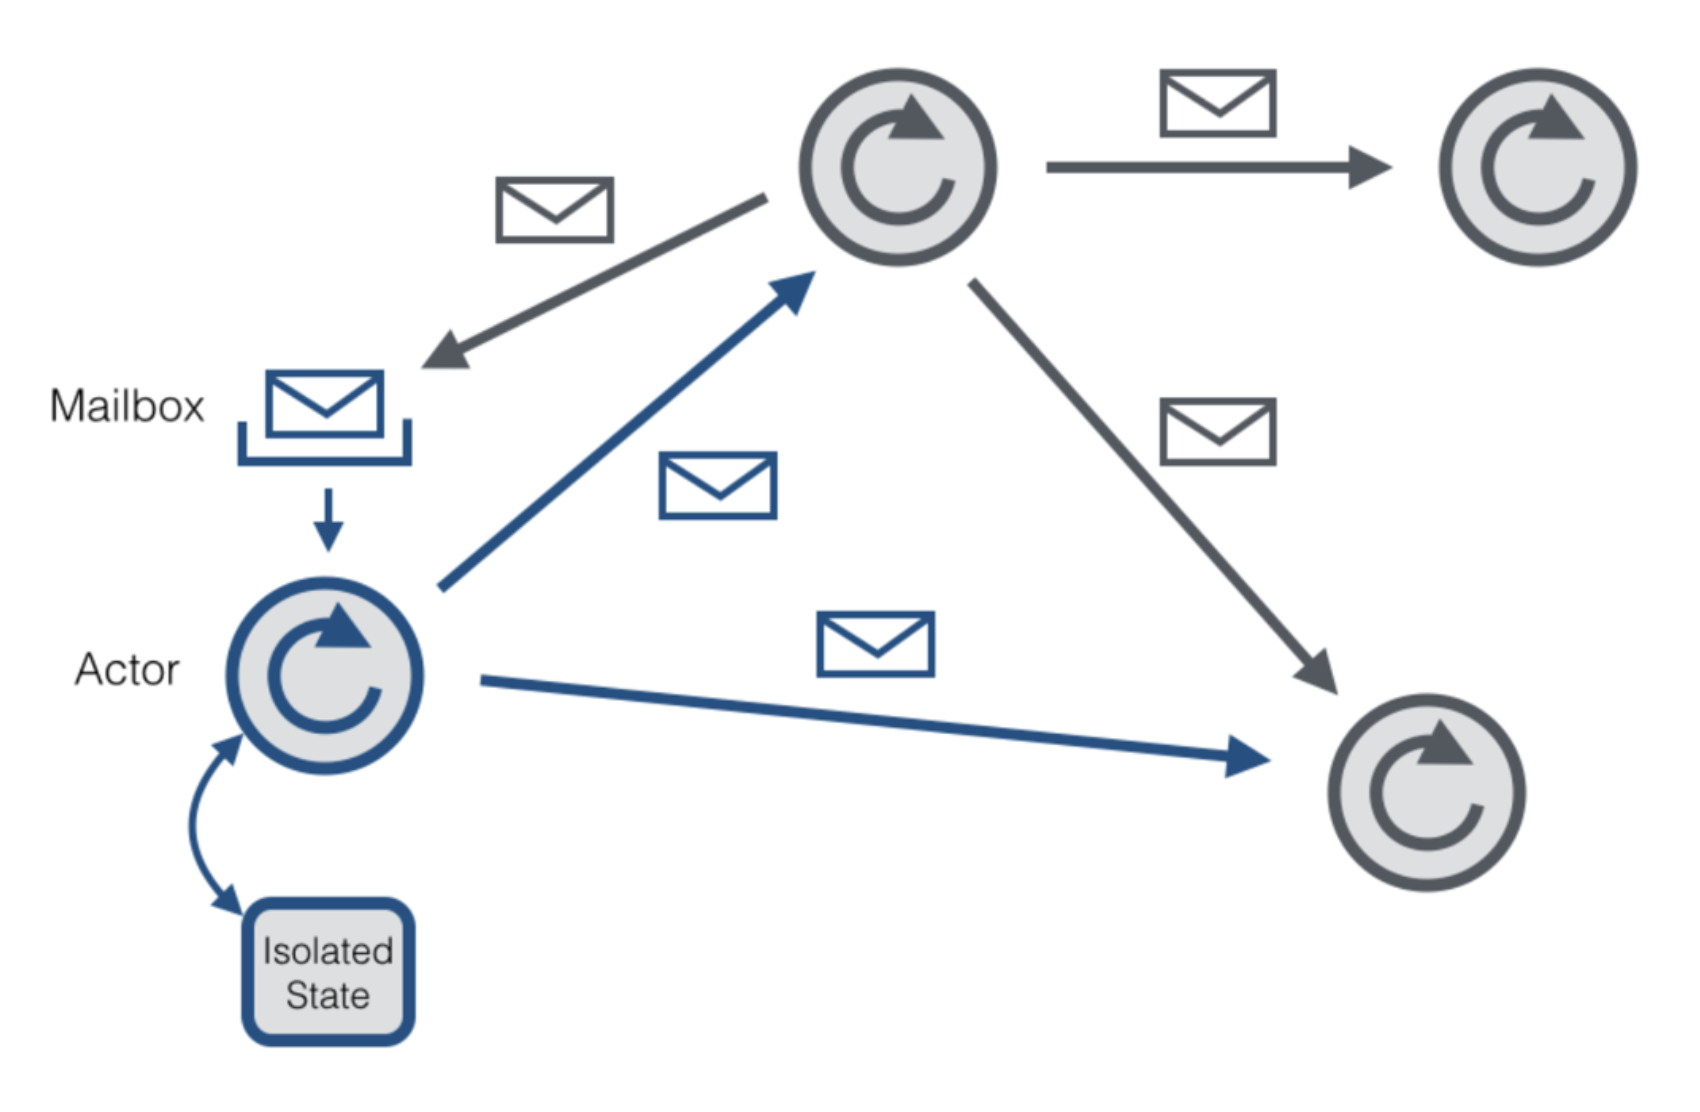
* Mailbox: 用于存储消息的队列 |
Actor的创建:
co_actor(^(COActorChan *chan) { |
it(@"next in chan", ^{ |
7. COTuple用法
COPromise<COTuple*>* |
8. 协程内延迟
co_delay 可以暂停所在的协程但是协程所在的线程不会停止运行,线程内部的其他协程也不会暂停,co_delay只能在协程内部运行,如果在外部执行的话将会抛出异常。
co_launch(^{ |
9. cokit简介
cokit 为常用的一些原生方法提供了一些常用的分类供我们使用,主要涉及到文件网络的IO
- NSDictionary+Coroutine.h:主要用于将NSDictionary从文件中读取和写入文件。
- NSArray+Coroutine.h:主要用于读取NSPropertyList中的数组。
- NSString+Coroutine.h: 用于字符串从文件中读取和写入文件。
- NSData+Coroutine.h:主要用于将NSData数据从文件中读取和写入文件。
- NSFileManager+Coroutine.hw: 用于文件的操作
- NSJSONSerialization+Coroutine.hw: 用于JSON的序列化操作
- NSKeyedArchiver+Coroutine.h:用于归档类操作
- NSURLConnection+Coroutine.h,NSURLSession+Coroutine.h:用于网络请求操作
- NSUserDefaults+Coroutine.h:用于NSUserDefaults存储操作
- UIImage+Coroutine.h:用于获取图片操作