Android 中最让人感到兴奋的就是看到GitHub上各种自定义View的实现了,而自定义View对自己个人而言是那种痛并快乐的一件事情,一旦次数多了,不痛了也就能够感受到自定义View的所带来的快乐了,
在开始本篇博文之前,需要介绍下Android 控件的整体架构,这样对整个流程的介绍会更清晰:
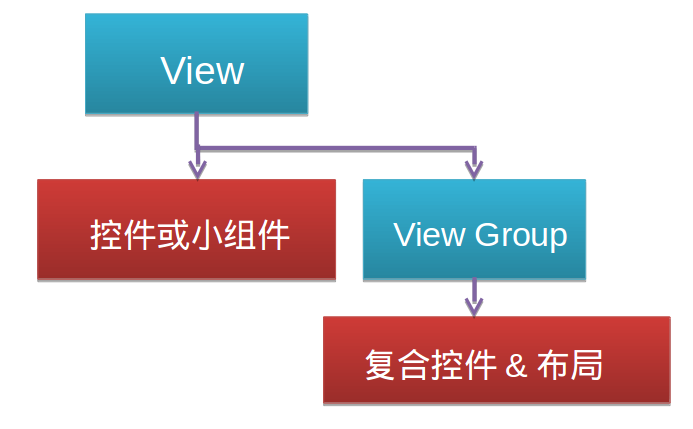
Android 控件的整体架构 Android中的所有可视化组件都是从View派生出来的,这些可视化组件通常被称为控件或者小组件,ViewGroup类是对View类的扩展,它用来包含多个视图,ViewGroup主要用于管理子视图布局和创建可重用的复合组件。它是View的容器,可以存放View 还可以存放ViewGroup,从而形成树状结构。
View以及ViewGroup的测量 为什么需要测量,这是因为在绘制一个View的时候不仅需要知道它的形状等信息,还需要知道它的大小信息。View的绘制工作在onMeasure方法中进行,通过这个方法可以指定该控件在屏幕上的大小,重写该方法时需要计算控件的实际大小,然后调用setMeasuredDimension(int, int)将确定尺寸数值设置为控件的实际大小。
测量模式有三种:
View 默认情况下支持EXACTLY模式,因此如果不重写onMeasure方法时,只能使用EXACTLY模式,所定义的View只能指定具体尺寸,或者是match_parent,而不能是wrap_content.如果需要支持wrap_content就必须重写onMeasure方法。
@Override protected void onMeasure(int widthMeasureSpec , int heightMeasureSpec ) { int finalWidth = getMeasuredLength(widthMeasureSpec , true ) ; int finalHeight = getMeasuredLength(heightMeasureSpec , false ) ; setMeasuredDimension(finalWidth , finalHeight ) ; } private int getMeasuredLength(int length , boolean isWidth ) { int specMode = MeasureSpec .Mode(length ) ; int specSize = MeasureSpec .Size(length ) ; int size; int padding = isWidth ? getPaddingLeft() + getPaddingRight() : getPaddingTop() + getPaddingBottom() ; if (specMode == MeasureSpec.EXACTLY) { size = specSize; } else { size = isWidth ? padding + DEFAULT_WIDTH : DEFAULT_HEIGHT + padding; if (specMode == MeasureSpec.AT_MOST) { size = Math . } } return size; }
View的绘制: 我们知道自定义一个View需要继承自View并重写构造方法以及onDraw方法。
覆写构造方法 一般我们在Android Studio创建一个View的时候,会要求复写构造方法,默认情况下会有三个构造函数:
public void CustomView (Context context) public void CustomView (Context context, AttributeSet attrs) public void CustomView (Context context, AttributeSet attrs, int defStyle)
第一个构造函数用在代码中动态创建对象时使用的,如果只打算在代码中动态创建一个view而不使用布局文件xml,那么就直接实现这个构造方法就可以了,但是一般都不这么做,因为难保证后面不会用在layout布局中,虽然后面使用的时候添加一个也很容易,但是一般项目代码都很庞大
第二个构造方法比第一个构造方法多了一个AttributeSet类型的参数,通过布局文件xml创建一个view时,这个参数会将xml里设定的属性传递给构造函数。如果采用xml方法却没有实现这种构造方法,那么虽然编译的时候会顺利通过但是运行时就会报错。
第三个构造方法比第二个构造方法多了一个defStyle的参数,这个参数用来指定view的默认style,如果为0将不会应用任何默认的style。那么这个值又是从哪里传过来的呢?
public class CustomView extends View public CustomView (Context context) { super (context); } public CustomView (Context context, AttributeSet attrs) { this (context, attrs, R .attr.CustomizeStyleRef ); } public CustomView (Context context, AttributeSet attrs, int defStyle) { super (context, attrs, defStyle); } }
定义属性
在res/values/attrs.xml文件中为添加自定义的属性的定义
<resources> <declare -styleable name ="Customize"> <attr name ="attr_1" format ="string" /> <attr name ="attr_2" format ="string" /> </declare -styleable> <attr name ="CustomizeStyle" format ="reference" /> </resources>
这里需要了解下属性的类型有哪些:
reference:引用某一资源ID。定义: <attr name = "background" format = "reference" /> 属性使用: android:background = "@drawable/图片ID"
color:颜色值。定义: <attr name = "textColor" format = "color" /> 属性使用: android:textColor = "#00FF00"
boolean:布尔值。定义: <attr name = "focusable" format = "boolean" /> 属性使用: android:focusable = "true"
dimension:尺寸值。定义: <attr name = "layout_width" format = "dimension" /> 属性使用: android:layout_width = "42dip"
float:浮点值。定义: <attr name = "fromAlpha" format = "float" /> 属性使用: android:fromAlpha = "1.0"
integer:整型值。定义: <attr name = "framesCount" format ="integer" /> 属性使用: android:frameDuration = "100"
string:字符串。定义: <attr name = "apiKey" format = "string" /> 属性使用: android:apiKey = "0jOkQ80oD1JL9C6HAja99uGXCRiS2CGjKO_bc_g"
fraction:百分数。定义: <attr name = "pivotX" format = "fraction" /> 属性使用: android:pivotY = "300%"
enum:枚举值。定义: <attr name ="orientation" > <enum name ="horizontal" value ="0" /> <enum name ="vertical" value ="1" /> </attr > 属性使用: android:orientation = "vertical"
flag:位或运算。定义: <attr name ="windowSoftInputMode" > <flag name = "stateUnspecified" value = "0" /> <flag name = "stateUnchanged" value = "1" /> <flag name = "stateHidden" value = "2" /> <flag name = "stateAlwaysHidden" value = "3" /> <flag name = "stateVisible" value = "4" /> <flag name = "stateAlwaysVisible" value = "5" /> <flag name = "adjustUnspecified" value = "0x00" /> <flag name = "adjustResize" value = "0x10" /> <flag name = "adjustPan" value = "0x20" /> <flag name = "adjustNothing" value = "0x30" /> </attr> 属性使用: android:windowSoftInputMode = "stateUnspecified | stateUnchanged | stateHidden" >
<attr name = "background" format = "reference|color" />
android:background = "@drawable/图片ID|#00FF00"
2.在xml中为相应的属性声明属性值
直接在layout中使用属性:这个就不做介绍了,一般布局很多都是这种方式 custom:attr_1=”attr one”
设置style并在style中设置属性<resources > <style name ="DirectStyle" > <item name ="attr_1" > attr one from DirectStyle</item > <item name ="attr_2" > attr two from DirectStyle</item > </style > </resources > 使用方式: style="@style/DirectStyle"
在主题中指定在当前Application或Activity中属性的默认值<style name ="AppTheme" parent ="AppBaseTheme" > <item name ="attr_1" > attr one from Theme</item > <item name ="CustomizeStyleRef" > @style/CustomizeStyle</item > </style >
在defStyle提供默认值
它们的顺序如下:
XML 中定义>style定义>由defStyle提供默认值>在Theme中指定的值
下面是个人实现自定义View为View添加属性时候的固定步骤:
<resources> <style name ="AppBaseTheme" parent ="android:Theme.Light" > </style > <style name ="AppTheme" parent ="AppBaseTheme" > //1 定义一个Style引用 <item name ="CustomizeStyleRef" > @style/CustomizeStyle</item > </style > <style name ="CustomizeStyle" > //Style项 <item name ="attr_1" > attr one from CustomizeStyle</item > </style > <style name ="DefaultCustomizeStyle" > <item name ="attr_1" > attr one from defalut style</item > </style > <style name ="DirectStyle" > <item name ="attr_1" > attr one from DirectStyle</item > </style > </resources>
如何获得属性值 public CustomView(Context context , AttributeSet attrs ) { this(context, attrs, R . } public CustomTextView(Context context , AttributeSet attrs , int defStyle ) { super(context, attrs, defStyle); TypedArray a = context.obtainStyledAttributes(attrs , R.styleable .Customize, defStyle ,R.style .DefaultCustomizeStyle) ; try { attr_1 = a.getString(R.styleable .Customize_attr_1) ; } finally { a.recycle() ; } ...
覆写onDraw方法绘制View [见绘图部分]
覆写onTouch等事件相应方法 [见事件部分]
设置控件的回调接口
自定义View步骤总结:
继承View或继承View的子类
在res/values/attrs.xm 中新增节点定义自定义属性
将自定义View放到布局文件中,注意命名空间名的格式为http://schemas.android.com/apk/res/[自定义View所在的包路径] 比如<?xml version="1.0" encoding="utf-8" ?> <LinearLayout xmlns:android ="http://schemas.android.com/apk/res/android" xmlns:custom ="http://schemas.android.com/apk/res/com.example.customviews" > <com.example.customviews.CustomView custom:attr_1 ="dddddddddddd" /> </LinearLayout >
在XML布局中设定指定属性的值
在CustomView 中获取对应的属性值并覆写构造方法以及onDraw方法
覆写onTouch等事件相应方法
自定义View过程中除了上述介绍的onMeasue方法还有如下重要的回调方法:
onFinishInflate() 从XML加载组件后调用
自定义View是一个需要很长时间实践才能掌握的技术,上面进阶是一些死东西,活的东西需要在实践中不断积累,多看别人的作品,并多实践是掌握自定义View的不二法则,下面是一些我之前收集的一些较好的博文,推荐给大家。
blog.csdn.net/jdsjlzx/article/details/41113969http://blog.csdn.net/lmj623565791/article/details/24252901 http://www.jcodecraeer.com/a/anzhuokaifa/androidkaifa/2015/0606/3001.html http://blog.csdn.net/feelang/article/details/45035759 http://www.zhihu.com/question/41101031 http://blog.csdn.net/singwhatiwanna/article/details/38168103 http://blog.csdn.net/aigestudio/article/details/41447349