Android-进阶之自定义View 一 自定义View 流程
Android 中最让人感到兴奋的就是看到GitHub上各种自定义View的实现了,而自定义View对自己个人而言是那种痛并快乐的一件事情,一旦次数多了,不痛了也就能够感受到自定义View的所带来的快乐了,
但是自己坦白还没到那种水平,自定义View有一定的固定套路,也有一部分很灵活的部分,而最重要的部分恰恰是后者,该博文将只会介绍Android控件的整体架构,自定义View固定流程,后续将会另起一个专题专门将工作这段时间所实现的一些比较好玩的自定义View。
在开始本篇博文之前,需要介绍下Android 控件的整体架构,这样对整个流程的介绍会更清晰:
Android 控件的整体架构
Android中的所有可视化组件都是从View派生出来的,这些可视化组件通常被称为控件或者小组件,ViewGroup类是对View类的扩展,它用来包含多个视图,ViewGroup主要用于管理子视图布局和创建可重用的复合组件。它是View的容器,可以存放View 还可以存放ViewGroup,从而形成树状结构。
每个控件树都有一个ViewParent,它负责所有交互事件的调度和分配,并且顺着控件树,上层的控件负责下层空间的测量与绘制,每个View占据屏幕上的一个矩形区域,每个View对象负责这个矩形区域的测度、布局、绘图、焦点改变、滚动、触摸,手势等交互事件的处理。
根节点要求它的孩子节点绘制它自己,每个ViewGroup节点要求调用自己的子视图绘制自己。子视图可以往父视图中请求指定的尺寸数据,但是每个子视图的父视图对象对子视图的尺寸有最终决定权,也就是说子视图可以告诉乎视图要求多大的空间,但是父视图会纵观全局来决定实际分配给每个子视图的大小。如果元素有重叠的地方,重叠部分后面绘制的将在之前绘制的上面。经过上述过程至顶向下的绘制最终绘制出整个页面;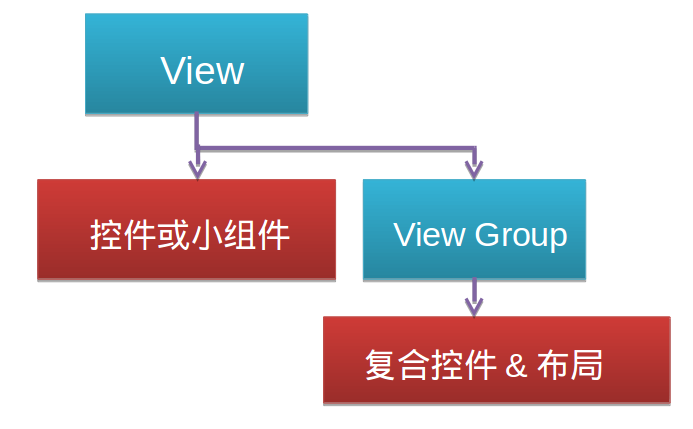
每个Activity都持有一个Window对象,它是一个抽象类,它有一个子类PhoneWindow是Window类的具体实现,可以通过PhoneWindow具体去绘制窗口。
DecorView 是PhoneWindow类的内部类,它是窗口界面的顶层视图,是所有应用窗口的根View。大部分事件都是由它传递给view,一般情况下它有上下两部分组成,它将要显示的内容呈现在PhoneWindow上。如下图所示,一个是TitleView,一个是ContentView,我们可以通过setContentView来将布局添加到ContentView中。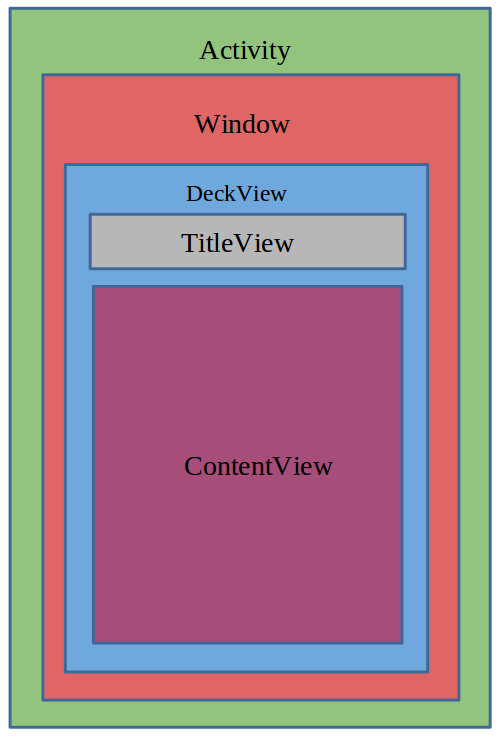
View以及ViewGroup的测量
为什么需要测量,这是因为在绘制一个View的时候不仅需要知道它的形状等信息,还需要知道它的大小信息。View的绘制工作在onMeasure方法中进行,通过这个方法可以指定该控件在屏幕上的大小,重写该方法时需要计算控件的实际大小,然后调用setMeasuredDimension(int, int)将确定尺寸数值设置为控件的实际大小。
onMeasure被调用的时候传入两个参数widthMeasureSpec和heightMeasureSpec。每个都是一个32位的int值它分成两个部分高两位为测量模式,低30位为测量的大小。
我们可以通过:
int mode = MeasureSpec.getMode(xxxxxxx)获取到模式,
int size = MeasureSpec.getSize(xxxxxxx)获取到尺寸数值。
测量模式有三种:
EXACTLY:精确模式,当我们将layout_height以及layout_width设置为具体数值时,或者设置为match_parent的时候,使用的是这种模式
AT_MOST:最大值模式,当控件的layout_height以及layout_width被设置为wrap_content属性的时候,使用的是这种模式,这种模式下控件的尺寸只要不超过父控件允许的最大尺寸即可。
UNSPECIFIED:这种情况我见得不是很多,基本上没有用到。
View 默认情况下支持EXACTLY模式,因此如果不重写onMeasure方法时,只能使用EXACTLY模式,所定义的View只能指定具体尺寸,或者是match_parent,而不能是wrap_content.如果需要支持wrap_content就必须重写onMeasure方法。
@Override |
View的绘制:
我们知道自定义一个View需要继承自View并重写构造方法以及onDraw方法。
public void CustomView(Context context) {} |
第一个构造函数用在代码中动态创建对象时使用的,如果只打算在代码中动态创建一个view而不使用布局文件xml,那么就直接实现这个构造方法就可以了,但是一般都不这么做,因为难保证后面不会用在layout布局中,虽然后面使用的时候添加一个也很容易,但是一般项目代码都很庞大
。如果没有遵守这个规则的话,后面谁来在你的平台上开发的话,将其用在XML布局文件中,就会引起问题,虽然这种错误很好排查,但是如果遇到这种情况一般都会问候下原先维护这个代码的那个人。所以如果不想在离职后还被别人挂念还是继续实现后面两个构造方法吧。
第二个构造方法比第一个构造方法多了一个AttributeSet类型的参数,通过布局文件xml创建一个view时,这个参数会将xml里设定的属性传递给构造函数。如果采用xml方法却没有实现这种构造方法,那么虽然编译的时候会顺利通过但是运行时就会报错。
第三个构造方法比第二个构造方法多了一个defStyle的参数,这个参数用来指定view的默认style,如果为0将不会应用任何默认的style。那么这个值又是从哪里传过来的呢?
一般这个系统是不调用的,一般用于提供给第二个构造方法使用的,在第二个构造方法中会传给第三个构造方法一个默认的style id。
public class CustomView extends View { |
- 定义属性
在res/values/attrs.xml文件中为添加自定义的属性的定义
<resources> |
这里需要了解下属性的类型有哪些:
- reference:引用某一资源ID。
定义:
<attr name = "background" format = "reference" />
属性使用:
android:background = "@drawable/图片ID" - color:颜色值。
定义:
<attr name = "textColor" format = "color" />
属性使用:
android:textColor = "#00FF00" - boolean:布尔值。
定义:
  <attr name = "focusable" format = "boolean" />
属性使用:
android:focusable = "true" - dimension:尺寸值。
定义:
<attr name = "layout_width" format = "dimension" />
属性使用:
android:layout_width = "42dip" - float:浮点值。
定义:
 <attr name = "fromAlpha" format = "float" />
属性使用:
android:fromAlpha = "1.0" - integer:整型值。
定义:
 <attr name = "framesCount" format="integer" />
属性使用:
android:frameDuration = "100" - string:字符串。
定义:
 <attr name = "apiKey" format = "string" />
属性使用:
android:apiKey = "0jOkQ80oD1JL9C6HAja99uGXCRiS2CGjKO_bc_g" - fraction:百分数。
定义:
 <attr name = "pivotX" format = "fraction" />
属性使用:
android:pivotY = "300%" - enum:枚举值。
定义:
 <attr name="orientation">
      <enum name="horizontal" value="0" />
      <enum name="vertical" value="1" />
  </attr>
属性使用:
android:orientation = "vertical" - flag:位或运算。属性定义时可以指定多种类型值。
定义:
 <attr name="windowSoftInputMode">
  <flag name = "stateUnspecified" value = "0" />
  <flag name = "stateUnchanged" value = "1" />
  <flag name = "stateHidden" value = "2" />
  <flag name = "stateAlwaysHidden" value = "3" />
  <flag name = "stateVisible" value = "4" />
  <flag name = "stateAlwaysVisible" value = "5" />
  <flag name = "adjustUnspecified" value = "0x00" />
  <flag name = "adjustResize" value = "0x10" />
  <flag name = "adjustPan" value = "0x20" />
  <flag name = "adjustNothing" value = "0x30" />
 </attr>
属性使用:
android:windowSoftInputMode = "stateUnspecified | stateUnchanged | stateHidden"><attr name = "background" format = "reference|color" />
android:background = "@drawable/图片ID|#00FF00"
2.在xml中为相应的属性声明属性值
- 直接在layout中使用属性:这个就不做介绍了,一般布局很多都是这种方式 custom:attr_1=”attr one”
- 设置style并在style中设置属性
<resources>

    <style name="DirectStyle">
        <item name="attr_1">attr one from DirectStyle</item>
        <item name="attr_2">attr two from DirectStyle</item>
    </style>

</resources>

使用方式:
style="@style/DirectStyle" - 在主题中指定在当前Application或Activity中属性的默认值
<style name="AppTheme" parent="AppBaseTheme">
    <item name="attr_1">attr one from Theme</item>
    <item name="CustomizeStyleRef">@style/CustomizeStyle</item>
</style> - 在defStyle提供默认值
它们的顺序如下:
XML中定义>style定义>由defStyle提供默认值>在Theme中指定的值 |
下面是个人实现自定义View为View添加属性时候的固定步骤:
<resources> |
如何获得属性值
public CustomView(Context context, AttributeSet attrs) {
    this(context, attrs, R.attr.CustomizeStyleRef);//注意这里是从attr获取
}

public CustomTextView(Context context, AttributeSet attrs, int defStyle) {
    super(context, attrs, defStyle);
    TypedArray a = context.obtainStyledAttributes(attrs, R.styleable.Customize, defStyle,R.style.DefaultCustomizeStyle);
    try {
        attr_1 = a.getString(R.styleable.Customize_attr_1);//注意这里!!!!!格式是定义属性名_属性名
    } finally {
        a.recycle();//TypedArry是一个共享的资源,使用完毕必须回收它。
    }
    ...
}
覆写onDraw方法绘制View
[见绘图部分]
覆写onTouch等事件相应方法
[见事件部分]
设置控件的回调接口
自定义View步骤总结:
- 继承View或继承View的子类
- 在res/values/attrs.xm 中新增
节点定义自定义属性 - 将自定义View放到布局文件中,注意命名空间名的格式为http://schemas.android.com/apk/res/[自定义View所在的包路径] 比如
<LinearLayout xmlns:android="http://schemas.android.com/apk/res/android"
xmlns:custom="http://schemas.android.com/apk/res/com.example.customviews">
<com.example.customviews.CustomView
custom:attr_1="dddddddddddd" />
</LinearLayout> - 在XML布局中设定指定属性的值
- 在CustomView 中获取对应的属性值并覆写构造方法以及onDraw方法
- 覆写onTouch等事件相应方法
自定义View过程中除了上述介绍的onMeasue方法还有如下重要的回调方法:
onFinishInflate() 从XML加载组件后调用
onMeasure() 调用该方法进行测量
onLayout() 调用该方法确定显示的位置
onSizeChange() 组件大小改变的时候这个方法会被掉用
onTouchEvent 当触摸事件来临时被调用
自定义View是一个需要很长时间实践才能掌握的技术,上面进阶是一些死东西,活的东西需要在实践中不断积累,多看别人的作品,并多实践是掌握自定义View的不二法则,下面是一些我之前收集的一些较好的博文,推荐给大家。
[推荐博文]
blog.csdn.net/jdsjlzx/article/details/41113969
http://blog.csdn.net/lmj623565791/article/details/24252901
http://www.jcodecraeer.com/a/anzhuokaifa/androidkaifa/2015/0606/3001.html
http://blog.csdn.net/feelang/article/details/45035759
http://www.zhihu.com/question/41101031
http://blog.csdn.net/singwhatiwanna/article/details/38168103
http://blog.csdn.net/aigestudio/article/details/41447349
