Android Lint工具是个静态代码分析工具,它可以在不运行代码和编写测试用例的情况下帮你检查项目代码中的潜在bug以及优化你的代码。

1.Lint 工具的使用:

Lint 工具结构:

要使用Lint 工具进行检测需要具备如下几个部分元素:
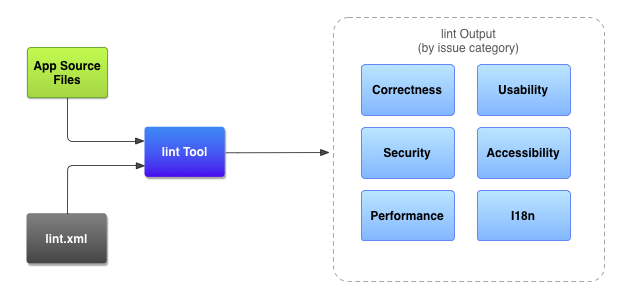
  • 应用源代码文件:
    包括Java文件,XML文件,图标,ProGuard配置文件。
  • lint.xml文件
    lint.xml文件是一个配置文件,用于指定你需要执行的lint检测项和自定义问题的严重等级。
  • lint 工具
    lint工具是以应用源码以及lint.xml作为输入的一个静态代码扫描工具,它可以通过命令行或者Android Studio IDE工具来启动。它主要检查代码的逻辑结构问题.一般在一个应用发布之前最好使用lint工具对项目代码进行一次检查。
  • 检查结果:
    lint的最终检查结果会显示在终端或者Android studio 的Event Log上。
运行Lint:

在Android Studio中可以为某个变异版本运行lint,或者为所有的版本运行lint。只需要在build.gradle中添加如下配置即可:

lintOptions {
// set to true to turn off analysis progress reporting by lint
quiet false
// if true, stop the gradle build if errors are found
abortOnError false
// if true, only report errors
ignoreWarnings true
}

如果要手动运行Lint 可以使用Analyze > Inspect Code.然后选择检测的范围和策略。

使用lint.xml文件配置Lint检查

我们可以在项目的根目录创建一个lint.xml文件,并在这个文件中指定lint检查选项。
lint.xml 文件包含了 父标签, 标签下面包含一个或者多个 元素. 每个 使用一个单独的属性值来指定。

<?xml version="1.0" encoding="UTF-8"?>
<lint>
<!-- list of issues to configure -->
</lint>

项中我们可以禁止某个检查,或者改变某个选项的严重等级。
下面是一个例子:

<?xml version="1.0" encoding="UTF-8"?>
<lint>
<!-- Disable the given check in this project -->
<issue id="IconMissingDensityFolder" severity="ignore" />
<!-- Ignore the ObsoleteLayoutParam issue in the specified files -->
<issue id="ObsoleteLayoutParam">
<ignore path="res/layout/activation.xml" />
<ignore path="res/layout-xlarge/activation.xml" />
</issue>
<!-- Ignore the UselessLeaf issue in the specified file -->
<issue id="UselessLeaf">
<ignore path="res/layout/main.xml" />
</issue>
<!-- Change the severity of hardcoded strings to "error" -->
<issue id="HardcodedText" severity="error" />
</lint>
在Android Studio Setting 中配置Lint:

Lint 会对各个检测项的等级都赋予一个严重级别,我们可以在Android Studio 的 Setting中搜索Inspections选项,在这个页面上你可以对每个检查项设置一个严重等级。在修改检测项级别的时候需要认真看下description,这里描述的是每个检查选项的具体内容。

在Java代码以及XML文件中配置lint检查选项

除了使用lint.xml以及Android Studio setting对Lint检查进行设定之外,还可以在Java和XML源文件中对Lint检查进行设定。

在Java代码中对Lint进行设置:
要禁止对某个指定的Java类或者方法的Lint检查可以在Java代码中添加@SuppressLint注释。

下面的代码会忽略对onCreate方法中的NewApi这个选项的检查,但是其他方法则不会忽略这个选项的检查。

@SuppressLint("NewApi")
@Override
public void onCreate(Bundle savedInstanceState) {
super.onCreate(savedInstanceState);
setContentView(R.layout.main);

下面的例子会忽略FeedProvider类的ParserError项的检查。

@SuppressLint("ParserError")
public class FeedProvider extends ContentProvider {

如果你要忽略所有项的检查可以使用如下的配置:

@SuppressLint("all")

在XML中配置lint的检查项:

我们可以使用tools:ignore 属性来禁止某个特定属性的检查,为了让这个属性被lint工具识别,必须先添加如下的名称空间:

namespace xmlns:tools="http://schemas.android.com/tools"

下面的例子展示了如何关闭 元素的UnusedResources的检查。这个选项会被它的子元素所继承,它所有的子节点都会忽略这个检查:

<LinearLayout
xmlns:android="http://schemas.android.com/apk/res/android"
xmlns:tools="http://schemas.android.com/tools"
tools:ignore="UnusedResources" >
<TextView
android:text="@string/auto_update_prompt" />
</LinearLayout>

要禁止一个或者多个选项可以使用逗号来隔开。

tools:ignore="NewApi,StringFormatInvalid"

要禁止所有选项的检查可以i使用如下属性:

tools:ignore="all"

深入阅读:
https://testerhome.com/topics/3105

Contents
  1. 1. 1.Lint 工具的使用:
    1. 1.0.1. Lint 工具结构:
    2. 1.0.2. 运行Lint:
    3. 1.0.3. 使用lint.xml文件配置Lint检查
    4. 1.0.4. 在Android Studio Setting 中配置Lint:
    5. 1.0.5. 在Java代码以及XML文件中配置lint检查选项