今天开始我将对目前较为流行的开源库以及开源框架的源码进行分析,希望能够通过学习这些源码背后的设计思想,从而让自己的编程和设计能力有所提高。http://square.github.io/picasso/
分析情景介绍
我们以一个最简单的使用情景来对源码进行分析:
Picasso.with(context) .load ("http://image.baidu.com/search/detail?z =0&ipn =") .into (imageView) ;
上面的代码是执行从网络上加载地址为http://image.baidu.com/search/detail?z=0&ipn= 的图片到指定的imageView控件中。
代码组织结构介绍
在分析源码之前我们先看下整个开源库的代码组织,但是大家如果将代码下载到本地后会感到失望,因为个人认为picasso的代码组织是极为不规范的,整个源码只有一个package。下面是我根据自己的理解将其源码进行重新的组织。总共分成5个包,
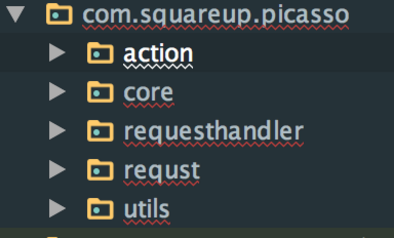
action包包含有:Action抽象类,FetchAction,GetAction,ImageViewAction,RemoteViewsAction,Target,TargetAction。
requst包中包含的是:Request,RequestCreator,DeferredRequestCreator
requesthandler包中包含的是:AssetRequestHandler,ContactsPhotoRequestHandler,ContentStreamRequestHandler,FileRequestHandler,MediaStoreRequestHandler,NetworkRequestHandler,ResourceRequestHandler,RequestHandler
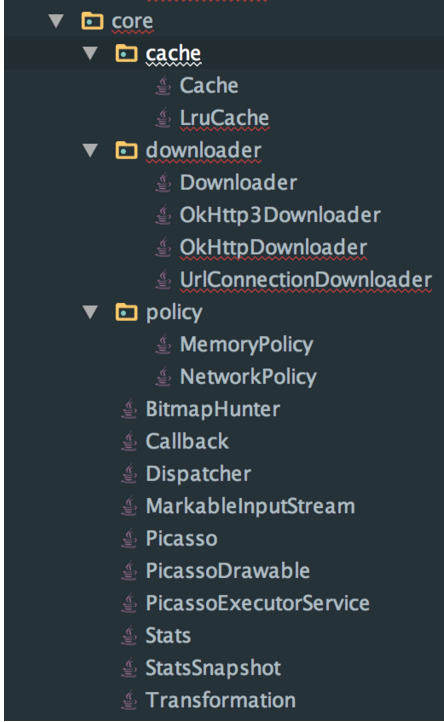
core包中包含有如下几个文件:
为什么这样分包大家可以在源码分析完后对整个流程以及每个类对职责有较为深入了解后进行思考。
3 .详细流程介绍
3.1 with 流程解析:
picasso默认对配置如下:
我们看下它是如何完成这部分的工作的,首先它使用建造者模式结合单例来创建picasso对象,之所以采用建造者模式是因为这种模式能够给配置参数多的对象的构建带来很大的方便。
public static Picasso with (@NonNull Context context) { if (context == null ) { throw new IllegalArgumentException("context == null" ); } if (singleton == null ) { synchronized (Picasso.class ) { if (singleton == null ) { singleton = new Builder(context).build(); } } } return singleton; }
我们能从Builder对象中获取到什么信息呢?一般一个对象的Builder是用于向外面暴露设置内部组件的接口(此接口非彼接口),通过暴露的接口来注入我们自定义的对象。Picasso 的 Builder也是一样的。通过它我们可以注入自定义的下载器,线程池,缓存,请求转换器,请求处理器,内部事件监听。它还有一个builder方法,它的用处就是在全部设置后,检查重要的组件是否有设置了,如果没有设置,那么就创建初始化组件来使用。
public static class Builder private final Context context; private Downloader downloader; private ExecutorService service; private Cache cache; private Listener listener; private RequestTransformer transformer; private List<RequestHandler> requestHandlers; private Bitmap.Config defaultBitmapConfig; private boolean indicatorsEnabled; private boolean loggingEnabled; public Builder(@NonNull Context context) { if (context == null ) { throw new IllegalArgumentException("Context must not be null." ); } this .context = context.getApplicationContext(); } public Builder defaultBitmapConfig(@NonNull Bitmap.Config bitmapConfig) { if (bitmapConfig == null ) { throw new IllegalArgumentException("Bitmap config must not be null." ); } this .defaultBitmapConfig = bitmapConfig; return this ; } public Builder downloader(@NonNull Downloader downloader) { if (downloader == null ) { throw new IllegalArgumentException("Downloader must not be null." ); } if (this .downloader != null ) { throw new IllegalStateException("Downloader already set." ); } this .downloader = downloader; return this ; } public Builder executor(@NonNull ExecutorService executorService) { if (executorService == null ) { throw new IllegalArgumentException("Executor service must not be null." ); } if (this .service != null ) { throw new IllegalStateException("Executor service already set." ); } this .service = executorService; return this ; } public Builder memoryCache(@NonNull Cache memoryCache) { if (memoryCache == null ) { throw new IllegalArgumentException("Memory cache must not be null." ); } if (this .cache != null ) { throw new IllegalStateException("Memory cache already set." ); } this .cache = memoryCache; return this ; } public Builder listener(@NonNull Listener listener) { if (listener == null ) { throw new IllegalArgumentException("Listener must not be null." ); } if (this .listener != null ) { throw new IllegalStateException("Listener already set." ); } this .listener = listener; return this ; } public Builder requestTransformer(@NonNull RequestTransformer transformer) { if (transformer == null ) { throw new IllegalArgumentException("Transformer must not be null." ); } if (this .transformer != null ) { throw new IllegalStateException("Transformer already set." ); } this .transformer = transformer; return this ; } public Builder addRequestHandler(@NonNull RequestHandler requestHandler) { if (requestHandler == null ) { throw new IllegalArgumentException("RequestHandler must not be null." ); } if (requestHandlers == null ) { requestHandlers = new ArrayList<RequestHandler>(); } if (requestHandlers.contains(requestHandler)) { throw new IllegalStateException("RequestHandler already registered." ); } requestHandlers.add(requestHandler); return this ; } public Builder indicatorsEnabled(boolean enabled) { this .indicatorsEnabled = enabled; return this ; } public Builder loggingEnabled(boolean enabled) { this .loggingEnabled = enabled; return this ; } public Picasso build() { Context context = this .context; if (downloader == null ) { downloader = Utils.createDefaultDownloader(context); } if (cache == null ) { cache = new LruCache(context); } if (service == null ) { service = new PicassoExecutorService(); } if (transformer == null ) { transformer = RequestTransformer.IDENTITY; } Stats stats = new Stats(cache); Dispatcher dispatcher = new Dispatcher(context, service, HANDLER, downloader, cache, stats); return new Picasso(context, dispatcher, cache, listener, transformer, requestHandlers, stats, defaultBitmapConfig, indicatorsEnabled, loggingEnabled); } }
接下来我们重点看下builder方法,如果我们没有注入自定义的下载器,那么就会调用createDefaultDownloader创建出一个下载器:
优先选用OKHttp3.如果没有那么就使用OkHttp,再没有那么使用Android 默认的下载方式public static Downloader createDefaultDownloader (Context context) { if (SDK_INT >= GINGERBREAD) { try { Class.forName("okhttp3.OkHttpClient" ); return OkHttp3DownloaderCreator.create (context) } catch (ClassNotFoundException ignored) { } try { Class.forName("com.squareup.okhttp.OkHttpClient" ); return OkHttpDownloaderCreator.create (context) } catch (ClassNotFoundException ignored) { } } return new UrlConnectionDownloader(context); }
public LruCache (@NonNull Context context) { this (Utils.calculateMemoryCacheSize(context)); }
根据是否是大堆栈类型,如果是则获取大堆栈存储,否则获取标准堆栈存储。然后使用大概15%的存储空间作为缓存。
static int calculateMemoryCacheSize(Context context ) { ActivityManager am = getService(context , ACTIVITY_SERVICE) ; boolean largeHeap = (context.getApplicationInfo() .flags & FLAG_LARGE_HEAP) != 0 ; int memoryClass = am.getMemoryClass() ; if (largeHeap && SDK_INT >= HONEYCOMB) { memoryClass = ActivityManagerHoneycomb .LargeMemoryClass(am ) ; } return (int ) (1024L * 1024L * memoryClass / 7 ); }
接着我们看下默认的线程池的设置:
class PicassoExecutorService extends ThreadPoolExecutor PicassoExecutorService () { super (DEFAULT_THREAD_COUNT , DEFAULT_THREAD_COUNT , 0 , TimeUnit .MILLISECONDS , new PriorityBlockingQueue <Runnable >(), new Utils .PicassoThreadFactory ()); } static class PicassoThreadFactory implements ThreadFactory @SuppressWarnings ("NullableProblems" ) public Thread newThread(Runnable r) { return new PicassoThread (r); } } private static class PicassoThread extends Thread public PicassoThread (Runnable r) { super (r); } @Override public void run() { Process .setThreadPriority(THREAD_PRIORITY_BACKGROUND ); super .run(); } }
紧接着我们来看下请求转换器:
public interface RequestTransformer { Request transformRequest(Request request ); RequestTransformer IDENTITY = new RequestTransformer() { @Override public Request transformRequest(Request request ) { return request ; } }; }
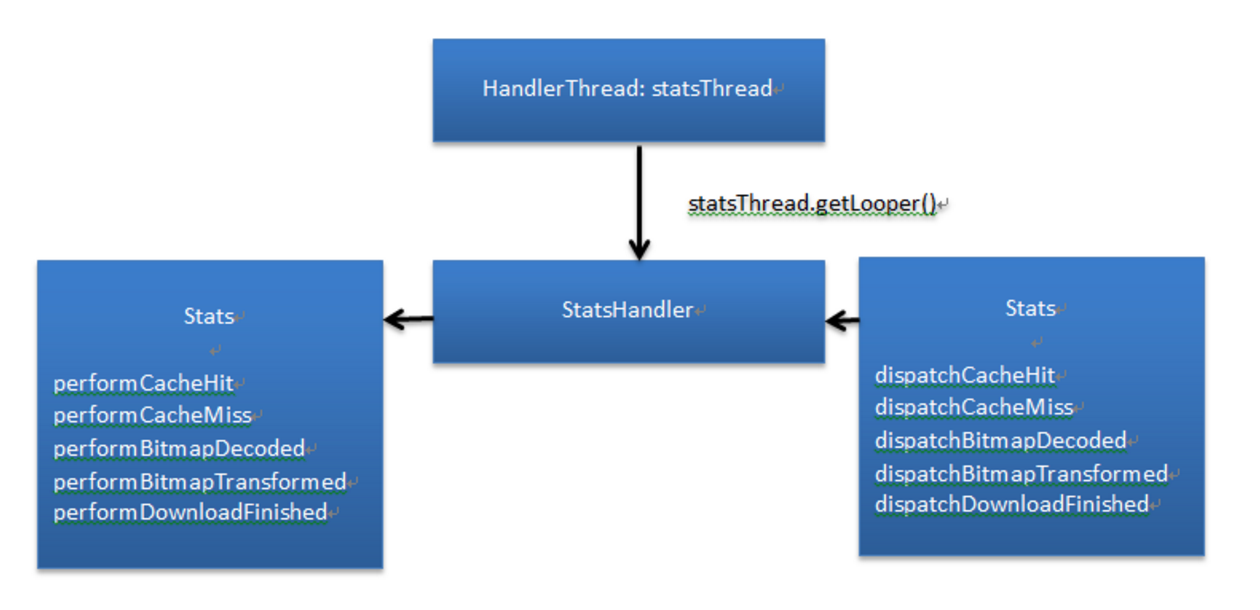
Picasso 还有一个统计对象States,用于统计Picasso中的各种事件。它的主要对象只有三个带有消息处理能力的HandlerThread线程,一个Cache引用,一个Handler。
final HandlerThread statsThread;final Cache cache;final Handler handler ;它的统计对象数据有: long cacheHits; long cacheMisses; long totalDownloadSize; long totalOriginalBitmapSize; long totalTransformedBitmapSize; long averageDownloadSize; long averageOriginalBitmapSize; long averageTransformedBitmapSize; int downloadCount; int originalBitmapCount; int transformedBitmapCount;
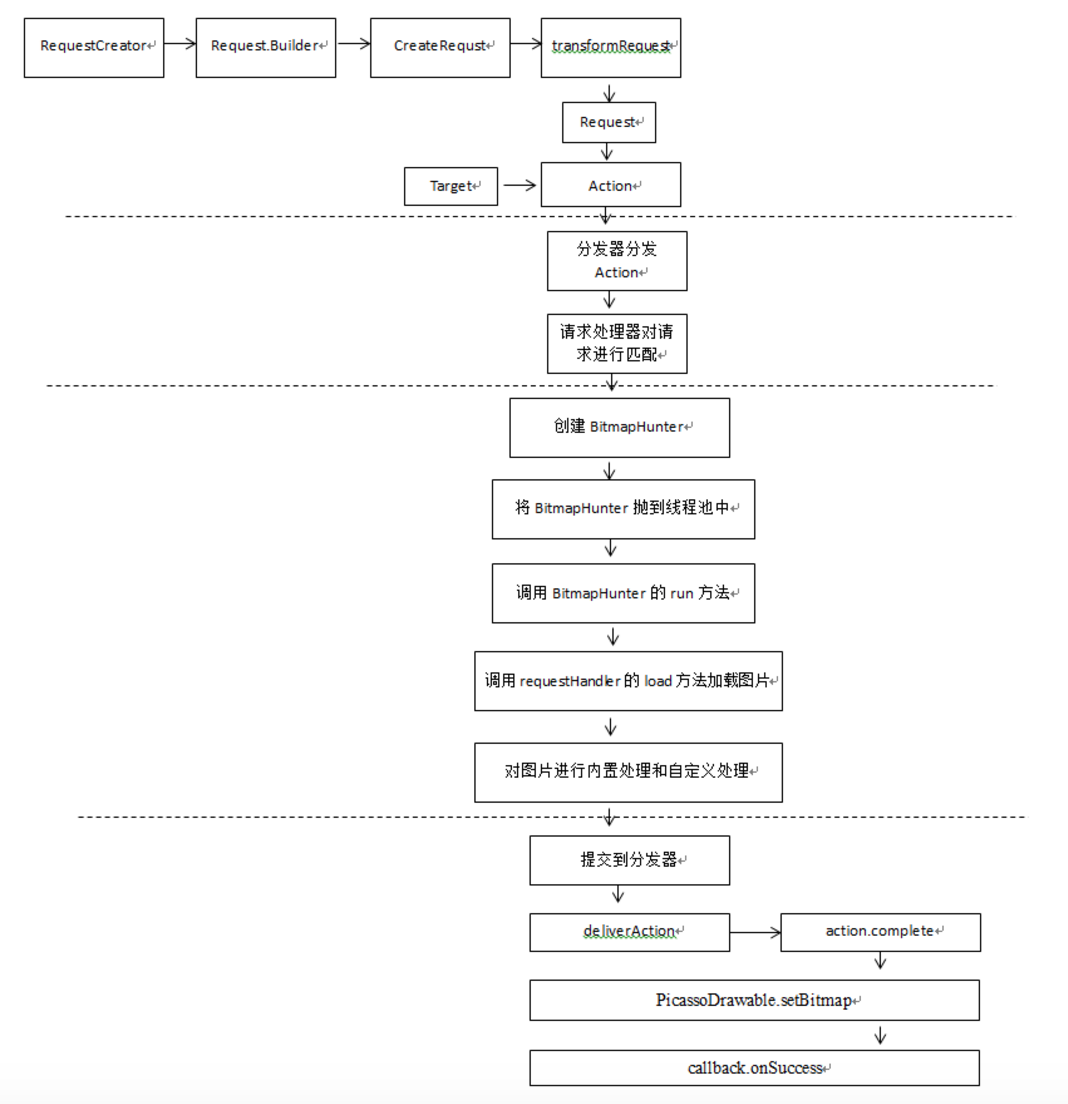
整个流程如下所示:
接下来我们继续看下Dispatcher,它负责分发Action的:
Dispatcher(Context context, ExecutorService service, Handler mainThreadHandler, Downloader downloader, Cache cache, Stats stats) { this .dispatcherThread = new DispatcherThread(); this .dispatcherThread.start(); this .handler = new DispatcherHandler(dispatcherThread.getLooper(), this ); this .mainThreadHandler = mainThreadHandler; this .service = service; this .hunterMap = new LinkedHashMap<String, BitmapHunter>(); this .failedActions = new WeakHashMap<Object, Action>(); this .pausedActions = new WeakHashMap<Object, Action>(); this .pausedTags = new HashSet<Object>(); this .downloader = downloader; this .cache = cache; this .stats = stats; this .batch = new ArrayList<BitmapHunter>(4 ); this .airplaneMode = Utils.isAirplaneModeOn(this .context); this .scansNetworkChanges = hasPermission(context, Manifest.permission.ACCESS_NETWORK_STATE); this .receiver = new NetworkBroadcastReceiver(this ); receiver.register(); }
整个流程还是和State对象一致,也是由HandlerThread + Handler构成,外部调用dispatchXXX方法传递事件,在Handler中周转下最终调用performXXXX进行处理。这个具体涉及到的时候再重点介绍。
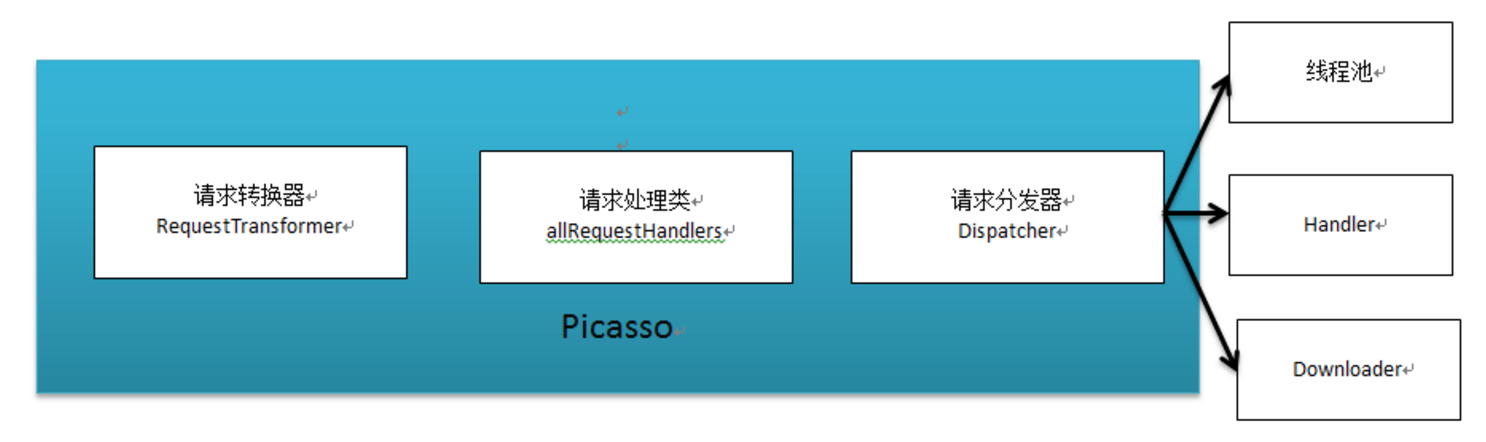
Picasso 有如下几个重要的对象:
RequestTransformer:请求转换器
Dispatcher:请求分发器
allRequestHandlers:请求处理器
Cache 缓存器
Stats 事件统计
CleanupThread 清除线程Picasso(Context context, Dispatcher dispatcher, Cache cache, Listener listener, RequestTransformer requestTransformer, List<RequestHandler> extraRequestHandlers, Stats stats, Bitmap.Config defaultBitmapConfig, boolean indicatorsEnabled, boolean loggingEnabled) { this .context = context; this .dispatcher = dispatcher; this .cache = cache; this .listener = listener; this .requestTransformer = requestTransformer; this .defaultBitmapConfig = defaultBitmapConfig; int builtInHandlers = 7 ; int extraCount = (extraRequestHandlers != null ? extraRequestHandlers.size() : 0 ); List<RequestHandler> allRequestHandlers = new ArrayList<RequestHandler>(builtInHandlers + extraCount); allRequestHandlers.add(new ResourceRequestHandler(context)); if (extraRequestHandlers != null ) { allRequestHandlers.addAll(extraRequestHandlers); } allRequestHandlers.add(new ContactsPhotoRequestHandler(context)); allRequestHandlers.add(new MediaStoreRequestHandler(context)); allRequestHandlers.add(new ContentStreamRequestHandler(context)); allRequestHandlers.add(new AssetRequestHandler(context)); allRequestHandlers.add(new FileRequestHandler(context)); allRequestHandlers.add(new NetworkRequestHandler(dispatcher.downloader, stats)); requestHandlers = Collections.unmodifiableList(allRequestHandlers); this .stats = stats; this .targetToAction = new WeakHashMap<Object, Action>(); this .targetToDeferredRequestCreator = new WeakHashMap<ImageView, DeferredRequestCreator>(); this .referenceQueue = new ReferenceQueue<Object>(); this .cleanupThread = new CleanupThread(referenceQueue, HANDLER); this .cleanupThread.start(); this .indicatorsEnabled = indicatorsEnabled; this .loggingEnabled = loggingEnabled; }
with流程总结:
Builder + 单例模式创建对象
通过Builder注入自定义对象,这里的自定义对象一般是抽象类或者接口,这样可以提供一个模板,用户可以通过这种方式来根据模板创建需要的对象。
3.2 load流程:
public RequestCreator load (@Nullable Uri uri) { return new RequestCreator (this, uri, 0 ); }
在load阶段传递的是用于标示图片的Uri. path resourceId等。返回的是RequestCreator
RequestCreator (Picasso picasso, Uri uri, int resourceId) { if (picasso.shutdown) { throw new IllegalStateException ( "Picasso instance already shut down. Cannot submit new requests." ); } this .picasso = picasso; this .data = new Request.Builder (uri, resourceId, picasso.defaultBitmapConfig); }
这里实际上只是创建了一个Request.Builder为创建请求对象做准备。load阶段很简单吧。 这个阶段重点记住load提供的接口有如下几种:
public RequestCreator load (@Nullable Uri uri) public RequestCreator load (@Nullable String path) public RequestCreator load (@NonNull File file) public RequestCreator load (@DrawableRes int resourceId)
load阶段总结:
3.3 into流程分析:
public void into(ImageView target, Callback callback) { long started = System .Time() ; checkMain() ; if (target == null) { throw new IllegalArgumentException("Target must not be null." ) ; } if (!data.hasImage() ) { picasso.cancelRequest(target ) ; if (setPlaceholder) { setPlaceholder(target , getPlaceholderDrawable () ); } return; } if (deferred) { if (data.hasSize() ) { throw new IllegalStateException("Fit cannot be used with resize." ) ; } int width = target.getWidth() ; int height = target.getHeight() ; if (width == 0 || height == 0 || target.isLayoutRequested() ) { if (setPlaceholder) { setPlaceholder(target , getPlaceholderDrawable () ); } picasso.defer(target, new DeferredRequestCreator(this , target , callback ) ); return; } data.resize(width, height); } Request request = createRequest(started ) ; String requestKey = createKey(request ) ; if (shouldReadFromMemoryCache(memoryPolicy ) ) { Bitmap bitmap = picasso.quickMemoryCacheCheck(requestKey ) ; if (bitmap != null) { picasso.cancelRequest(target ) ; setBitmap(target , picasso .context , bitmap , MEMORY, noFade , picasso .indicatorsEnabled ) ; if (picasso.loggingEnabled) { log(OWNER_MAIN, VERB_COMPLETED, request.plainId() , "from " + MEMORY); } if (callback != null) { callback.onSuccess() ; } return; } } if (setPlaceholder) { setPlaceholder(target , getPlaceholderDrawable () ); } Action action = new ImageViewAction(picasso , target , request , memoryPolicy ,networkPolicy , errorResId , errorDrawable , requestKey , tag , callback , noFade ) ; picasso.enqueueAndSubmit(action ) ; }
3.1.1 Request的创建过程
into阶段会先对传入的Uri进行判断,如果为空就取消请求。并根据需要决定是否显示占位符
private Request createRequest(long started ) { int id = nextId.getAndIncrement() ; Request request = data.build() ; request.id = id; request.started = started; Request transformed = picasso.transformRequest(request ) ; return transformed; }
我们先来看下Request.Builder 的 build方法:
public Request build() { if (centerInside && centerCrop) { throw new IllegalStateException ("Center crop and center inside can not be used together." ); } if (centerCrop && (targetWidth == 0 && targetHeight == 0 )) { throw new IllegalStateException ( "Center crop requires calling resize with positive width and height." ); } if (centerInside && (targetWidth == 0 && targetHeight == 0 )) { throw new IllegalStateException ( "Center inside requires calling resize with positive width and height." ); } if (priority == null ) { priority = Priority.NORMAL; } return new Request (uri, resourceId, stableKey, transformations, targetWidth, targetHeight, centerCrop, centerInside, centerCropGravity, onlyScaleDown, rotationDegrees, rotationPivotX, rotationPivotY, hasRotationPivot, purgeable, config, priority); } }
上述的build过程首先对参数进行检查,通过上述的Requst对象中注入了包括uri在内的众多参数。
static String createKey(Request data , StringBuilder builder) { if (data .stableKey != null ) { builder .ensureCapacity (data .stableKey .length () + KEY_PADDING ); builder .append (data .stableKey ); } else if (data .uri != null ) { String path = data .uri .toString (); builder .ensureCapacity (path .length () + KEY_PADDING ); builder .append (path ); } else { builder .ensureCapacity (KEY_PADDING ); builder .append (data .resourceId ); } builder.append(KEY_SEPARATOR ); if (data .rotationDegrees != 0) { builder .append ("rotation :").append (data .rotationDegrees ); if (data .hasRotationPivot ) { builder .append ('@').append (data .rotationPivotX ).append ('x' ).append (data .rotationPivotY ); } builder.append(KEY_SEPARATOR ); } if (data .hasSize()) { builder .append ("resize :").append (data .targetWidth ).append ('x' ).append (data .targetHeight ); builder .append (KEY_SEPARATOR ); } if (data .centerCrop) { builder .append ("centerCrop :").append (data .centerCropGravity ).append (KEY_SEPARATOR ); } else if (data .centerInside ) { builder .append ("centerInside ").append (KEY_SEPARATOR ); } if (data .transformations != null) { //noinspection ForLoopReplaceableByForEach for (int i = 0, count = data .transformations .size (); i < count ; i ++) { builder .append (data .transformations .get (i ).key ()); builder .append (KEY_SEPARATOR ); } } return builder.toString(); }
3.1.2 发起请求
( 1 ) 从缓存预取
Bitmap quickMemoryCacheCheck(String key) { Bitmap cached = cache.get(key); cached != null) { stats.dispatchCacheHit(); stats.dispatchCacheMiss(); return cached;
(2) 创建Action 通过其他途径获取
在into阶段首先会使用load阶段创建的RequstCreator来创建一个Request,并设置Requst的id以及启动时间这两个关键,参数,在创建Request这个过程中会先检查一系列的参数,然后再new出一个Requst对象出来。然后再使用创建出的Requst对象的参数创建出作为Request标示的requestKey。
我们继续看接下来的流程:
void enqueueAndSubmit(Action action ) { //获取Action 中的target Object target = action .getTarget(); //如果当前targetToAction 中记录的 Target 中指定的action 不是当前的action 说明之前已经指定了,那么取消原先的 if (target cancelExistingRequest(target ); //提交到targetToAction targetToAction.put(target , action ); } //提交到分发器 submit(action ); }
分发器分发请求:
void submit (Action action ) { dispatcher.dispatchSubmit (action); }
void dispatchSubmit(Action action ) { handler.sendMessage(handler .obtainMessage (REQUEST_SUBMIT, action ) ); }
@Override public void handleMessage (final Message msg) { switch (msg.what) { case REQUEST_SUBMIT: { Action action = (Action) msg.obj; dispatcher.performSubmit(action); break ; } } } }
void performSubmit(Action action ) { performSubmit(action , true ) ; }
上面的流程在之前已经介绍了,由外部调用dispatchXXXX方法,然后传递给Hander,然后再由performXXXXX进行处理。
匹配requestHandler封装到BitmapHunter:
void performSubmit(Action action , boolean dismissFailed ) { if (pausedTags.contains(action.getTag() )) { pausedActions.put(action.getTarget() , action); return; } BitmapHunter hunter = hunterMap.get(action.getKey() ); if (hunter != null) { hunter.attach(action); return; } hunter = for Request(action .getPicasso () , this, cache, stats, action); hunter.future = service.submit(hunter); hunterMap.put(action.getKey() , hunter); if (dismissFailed) { failedActions.remove(action.getTarget() ); } }
forRequst 方法中取出请求,以及请求处理器列表。依次调用请求处理器的canHandleRequst来判断当前requstHandler是否能够处理当前的请求。
static BitmapHunter for Request(Picasso picasso , Dispatcher dispatcher , Cache cache , Stats stats , Action action ) { Request request = action.getRequest() ; List<RequestHandler> requestHandlers = picasso.getRequestHandlers() ; for (int i = 0 , count = requestHandlers.size() ; i < count; i++) { RequestHandler requestHandler = requestHandlers.get(i); if (requestHandler.canHandleRequest(request ) ) { return new BitmapHunter(picasso , dispatcher , cache , stats , action , requestHandler ) ; } } return new BitmapHunter(picasso , dispatcher , cache , stats , action , ERRORING_HANDLER) ; }
每个requestHandler都有一个canHandleRequst的方法,将request进去,在这个方法中将根据请求的Uri来进行匹配。当前是否可以处理这个类型的请求。所以在new Picasso 对象的时候各个requestHandler的请求对象的添加顺序很关键。
public boolean canHandleRequest(Request data ) { String scheme = data .uri.getScheme(); return (SCHEME_HTTP.equals (scheme) || SCHEME_HTTPS.equals (scheme)); }
在添加到线程池后将会调用BitmapHunter的run方法。在run方法中主要是获取最终的Bitmap,然后再通过分发器来返回结果。
public void run () updateThreadName(data); result = hunt(); if (result == null ) { dispatcher.dispatchFailed(this ); } else { dispatcher.dispatchComplete(this ); } }
通过requestHandler中的load方法加载图片数据:
Bitmap hunt() throws IOException { Bitmap bitmap = null; if (shouldReadFromMemoryCache(memoryPolicy ) ) { bitmap = cache.get(key); if (bitmap != null) { stats.dispatchCacheHit() ; loadedFrom = MEMORY; return bitmap; } } data.networkPolicy = retryCount == 0 ? NetworkPolicy .OFFLINE . RequestHandler.Result result = requestHandler.load(data, networkPolicy); if (result != null) { loadedFrom = result.getLoadedFrom() ; exifOrientation = result.getExifOrientation() ; bitmap = result.getBitmap() ; if (bitmap == null) { InputStream is = result.getStream() ; try { bitmap = decodeStream(is , data ) ; } finally { Utils .Quietly(is ) ; } } } if (bitmap != null) { stats.dispatchBitmapDecoded(bitmap ) ; if (data.needsTransformation() || exifOrientation != 0 ) { synchronized (DECODE_LOCK) { if (data.needsMatrixTransform() || exifOrientation != 0 ) { bitmap = transformResult(data , bitmap , exifOrientation ) ; } if (data.hasCustomTransformations() ) { bitmap = applyCustomTransformations(data .transformations , bitmap ) ; } } if (bitmap != null) { stats.dispatchBitmapTransformed(bitmap ) ; } } } return bitmap; }
public Result load (Request request, int networkPolicy) throws IOException { Response response = downloader.load(request.uri, request.networkPolicy); if (response == null ) { return null ; } Picasso.LoadedFrom loadedFrom = response.cached ? DISK : NETWORK; Bitmap bitmap = response.getBitmap(); if (bitmap != null ) { return new Result (bitmap, loadedFrom); } InputStream is = response.getInputStream(); if (is == null ) { return null ; } if (loadedFrom == DISK && response.getContentLength() == 0 ) { Utils.closeQuietly(is); throw new ContentLengthException ("Received response with 0 content-length header." ); } if (loadedFrom == NETWORK && response.getContentLength() > 0 ) { stats.dispatchDownloadFinished(response.getContentLength()); } return new Result (is, loadedFrom); }
图像执行内部以及自定义变换处理:
static Bitmap transformResult(Request data , Bitmap result , int exifOrientation ) { int inWidth = result.getWidth() ; int inHeight = result.getHeight() ; boolean onlyScaleDown = data.onlyScaleDown; int drawX = 0 ; int drawY = 0 ; int drawWidth = inWidth; int drawHeight = inHeight; Matrix matrix = new Matrix() ; if (data.needsMatrixTransform() || exifOrientation != 0 ) { int targetWidth = data.targetWidth; int targetHeight = data.targetHeight; float targetRotation = data.rotationDegrees; if (targetRotation != 0 ) { double cosR = Math .Math .to Radians(targetRotation ) ); double sinR = Math .Math .to Radians(targetRotation ) ); if (data.hasRotationPivot) { matrix.setRotate(targetRotation , data .rotationPivotX , data .rotationPivotY ) ; double x1T = data.rotationPivotX * (1.0 - cosR) + (data.rotationPivotY * sinR); double y1T = data.rotationPivotY * (1.0 - cosR) - (data.rotationPivotX * sinR); double x2T = x1T + (data.targetWidth * cosR); double y2T = y1T + (data.targetWidth * sinR); double x3T = x1T + (data.targetWidth * cosR) - (data.targetHeight * sinR); double y3T = y1T + (data.targetWidth * sinR) + (data.targetHeight * cosR); double x4T = x1T - (data.targetHeight * sinR); double y4T = y1T + (data.targetHeight * cosR); double maxX = Math .Math .Math . double minX = Math .Math .Math . double maxY = Math .Math .Math . double minY = Math .Math .Math . targetWidth = (int ) Math . targetHeight = (int ) Math . } else { matrix.setRotate(targetRotation ) ; double x1T = 0.0 ; double y1T = 0.0 ; double x2T = (data.targetWidth * cosR); double y2T = (data.targetWidth * sinR); double x3T = (data.targetWidth * cosR) - (data.targetHeight * sinR); double y3T = (data.targetWidth * sinR) + (data.targetHeight * cosR); double x4T = -(data.targetHeight * sinR); double y4T = (data.targetHeight * cosR); double maxX = Math .Math .Math . double minX = Math .Math .Math . double maxY = Math .Math .Math . double minY = Math .Math .Math . targetWidth = (int ) Math . targetHeight = (int ) Math . } } if (exifOrientation != 0 ) { int exifRotation = getExifRotation(exifOrientation ) ; int exifTranslation = getExifTranslation(exifOrientation ) ; if (exifRotation != 0 ) { matrix.preRotate(exifRotation ) ; if (exifRotation == 90 || exifRotation == 270 ) { int tmpHeight = targetHeight; targetHeight = targetWidth; targetWidth = tmpHeight; } } if (exifTranslation != 1 ) { matrix.postScale(exifTranslation , 1) ; } } if (data.centerCrop) { float widthRatio = targetWidth != 0 ? targetWidth / (float ) inWidth : targetHeight / (float ) inHeight; float heightRatio = targetHeight != 0 ? targetHeight / (float ) inHeight : targetWidth / (float ) inWidth; float scaleX, scaleY; if (widthRatio > heightRatio) { int newSize = (int ) Math . * (heightRatio / widthRatio)); if ((data.centerCropGravity & Gravity.TOP) == Gravity.TOP) { drawY = 0 ; } else if ((data.centerCropGravity & Gravity.BOTTOM) == Gravity.BOTTOM) { drawY = inHeight - newSize; } else { drawY = (inHeight - newSize) / 2 ; } drawHeight = newSize; scaleX = widthRatio; scaleY = targetHeight / (float ) drawHeight; } else if (widthRatio < heightRatio) { int newSize = (int ) Math . * (widthRatio / heightRatio)); if ((data.centerCropGravity & Gravity.LEFT) == Gravity.LEFT) { drawX = 0 ; } else if ((data.centerCropGravity & Gravity.RIGHT) == Gravity.RIGHT) { drawX = inWidth - newSize; } else { drawX = (inWidth - newSize) / 2 ; } drawWidth = newSize; scaleX = targetWidth / (float ) drawWidth; scaleY = heightRatio; } else { drawX = 0 ; drawWidth = inWidth; scaleX = scaleY = heightRatio; } if (shouldResize(onlyScaleDown , inWidth , inHeight , targetWidth , targetHeight ) ) { matrix.preScale(scaleX , scaleY ) ; } } else if (data.centerInside) { float widthRatio = targetWidth != 0 ? targetWidth / (float ) inWidth : targetHeight / (float ) inHeight; float heightRatio = targetHeight != 0 ? targetHeight / (float ) inHeight : targetWidth / (float ) inWidth; float scale = widthRatio < heightRatio ? widthRatio : heightRatio; if (shouldResize(onlyScaleDown , inWidth , inHeight , targetWidth , targetHeight ) ) { matrix.preScale(scale , scale ) ; } } else if ((targetWidth != 0 || targetHeight != 0 ) && (targetWidth != inWidth || targetHeight != inHeight)) { float sx = targetWidth != 0 ? targetWidth / (float ) inWidth : targetHeight / (float ) inHeight; float sy = targetHeight != 0 ? targetHeight / (float ) inHeight : targetWidth / (float ) inWidth; if (shouldResize(onlyScaleDown , inWidth , inHeight , targetWidth , targetHeight ) ) { matrix.preScale(sx , sy ) ; } } } Bitmap newResult = Bitmap .Bitmap(result , drawX , drawY , drawWidth , drawHeight , matrix , true ) ; if (newResult != result) { result.recycle() ; result = newResult; } return result; }
接下来就是进行自定义的处理,这个是我们可以进行自己设置的。
static Bitmap applyCustomTransformations(List<Transformation> transformations, Bitmap result) { for (int i = 0 , count = transformations.size(); i < count; i++) { final Transformation transformation = transformations.get (i); Bitmap new Result ; try { new Result = transformation.transform(result); } catch (final RuntimeException e) { return null ; } result = new Result ; } return result; }
往主线程中返回处理后的Bitmap:
void dispatchComplete(BitmapHunter hunter ) { handler.sendMessage(handler .obtainMessage (HUNTER_COMPLETE, hunter ) ); }
case HUNTER_COMPLETE: { BitmapHunter hunter = (BitmapHunter) msg.obj; dispatcher.performComplete(hunter); break;
void performComplete(BitmapHunter hunter ) { if (shouldWriteToMemoryCache(hunter .getMemoryPolicy () )) { cache.set(hunter.getKey() , hunter.getResult() ); } hunterMap.remove(hunter.getKey() ); batch(hunter); }
private void batch (BitmapHunter hunter) if (hunter.isCancelled()) { return ; } batch.add(hunter); if (!handler .hasMessages(HUNTER_DELAY_NEXT_BATCH)) { handler .sendEmptyMessageDelayed(HUNTER_DELAY_NEXT_BATCH, BATCH_DELAY); } }
case HUNTER_DELAY_NEXT_BATCH: { dispatcher.performBatchComplete(); break ; }
这里将上面的BitmapHandler数组返回给主线程。
void performBatchComplete() { List<BitmapHunter> copy = new ArrayList<BitmapHunter>(batch); batch.clear() ; mainThreadHandler.sendMessage(mainThreadHandler .obtainMessage (HUNTER_BATCH_COMPLETE, copy ) ); }
显示图片处理:
case HUNTER_BATCH_COMPLETE: { // 获取BitmapHunter列表 List<BitmapHunter> batch = (List<BitmapHunter>) msg.obj; // 对BitmapHandler列表中的每个handler调用complete方法进行处理。 for (int i = 0 , n = batch.size(); i < n; i++) { // 调用complete进行处理 BitmapHunter hunter = batch.get(i); hunter.picasso.complete(hunter); } break ; }
在Picasso的complete方法中将会从BitmapHunter中获取到图片数据。通过deliverAction进行图片的显示。
void complete(BitmapHunter hunter) { Action single = hunter.getAction() ; List<Action> joined = hunter.getActions() ; boolean hasMultiple = joined != null && !joined.isEmpty() ; boolean shouldDeliver = single != null || hasMultiple; if (!shouldDeliver) { return; } Uri uri = hunter.getData() .uri; Exception exception = hunter.getException() ; Bitmap result = hunter.getResult() ; LoadedFrom from = hunter.getLoadedFrom() ; if (single != null) { deliverAction(result , from , single ) ; } if (hasMultiple) { for (int i = 0 , n = joined.size() ; i < n; i++) { Action join = joined.get(i); deliverAction(result , from , join ) ; } } if (listener != null && exception != null) { listener.onImageLoadFailed(this , uri , exception ) ; } }
在deliverAction中将会调用Action中的complete方法进行将图像显示到控件上。
private void deliverAction(Bitmap result, LoadedFrom from , Action action ) { if (result != null) { action .complete(result, from ); } else { action .error(); } }
最终是调用PicassoDrawable的setBitmap方法显示到ImageView上的。
@Override public void complete (Bitmap result, Picasso.LoadedFrom from) if (result == null ) { throw new AssertionError( String.format("Attempted to complete action with no result!\n%s" , this )); } ImageView target = this .target .get(); if (target == null ) { return ; } Context context = picasso.context; PicassoDrawable.setBitmap(target , context, result, from, noFade, indicatorsEnabled); if (callback != null ) { callback.onSuccess(); } }
static void setBitmap (ImageView target , Context context, Bitmap bitmap, Picasso.LoadedFrom loadedFrom, boolean noFade, boolean debugging) Drawable placeholder = target .getDrawable(); if (placeholder instanceof AnimationDrawable) { ((AnimationDrawable) placeholder).stop(); } PicassoDrawable drawable = new PicassoDrawable(context, bitmap, placeholder, loadedFrom, noFade, debugging); target .setImageDrawable(drawable); }
整个流程大致如下: